Self-publishing is an industry rich in jargon. From ARCs to front matter to bleeds, we’ve got some overwhelming terminology. So let’s start with one of the most important ones: your print-ready PDF file.
A Disclaimer: every print facility is going to have some specific requirements. We’re going to focus on Lulu’s Print-Ready file requirements here. They will NOT match every book printer around the world, so be sure to check with any printer you might use to get their specifications before submitting your file.
What is a Print-Ready File?
The name says it all. A Print-Ready file is prepared for the printer’s specifications.
Print-Ready files should always be PDF files.
When you format your book, you create a DOCX file from Word or an INDD file from InDesign. This file may be a beautiful representation of your book. But it is not yet a Print-Ready file. Your file format matters. While software like InDesign and Word have print capabilities, the file they actually send to the printer (be it an at-home printer or a large-scale book manufacturer) is always a PDF.
How to Make a Print-Ready PDF
Your word processor (like Microsoft Word, Scrivener, or Google Docs) all have options to export your manuscript as a PDF. But how do you know if it’s a print-ready file for Lulu?
- Export with Print Settings
The exact language varies, but you should always export from your Word Processor with the highest quality settings available.
- Open Your PDF in a PDF Editor
Now that you have a PDF, open it in Adobe Acrobat or your editor of choice.
- Check Fonts
Go to Files > Properties > Fonts. If all Fonts show (embedded subset) then your fonts are embedded.
- Check Images
Start a project on Lulu and upload your file. If any images in the file are low resolution, you will see a warning and the pages to review.
- Check for Layers
Same as Step #4, an uploaded file with multiple layers will display a notification that layers were flattened.
For more details about each important element in your PDF, keep reading!
What is a PDF?

What is a PDF?
Introduced nearly 30 years ago by Adobe, the Portable Document Format (or PDF) is a file format designed to ease the sharing and distribution of content. PDFs are the single most versatile and simple to share file, offering consistency across a range of writing, editing, and design platforms.
Likewise, a variety of PDF viewers and PDF readers make it easy to share book files.
No matter what your preferred book layout software is, you’ll need to adhere to the requirements for a PDF that Lulu’s printers can work with.

A Print-Ready File is always a PDF, and a Print-Ready PDF always uses the printer-on-demand providers’ specifications.
Print-Ready Requirements
Lulu has a set of rules that files need to adhere to. Don’t get stressed though! These aren’t difficult to apply to most files. Almost all page layout software will have the PDF export settings you need to ensure a perfect print-ready file.
But not all of them. And regardless of how much is automated, it’s valuable to understand the recommendations and requirements for your book design and file.
1. Image Resolution
If your file contains any images, save them at 300 dots per inch (dpi), and output a PDF that keeps the image resolution settings.
If the original image is less than 300 dpi, it may not be possible to achieve the image resolution we require. That’s okay. You can use lower-resolution images, but the print quality may be off. Grainy or pixelated images are the most common issue you’ll see with lower-resolution images.
2. Color Space
Your Color Space defines a set of colors and their organization. Importantly, you want to be sure your file uses the same color space our printers use, so the colors you see on your screen match the colors in the printed book.
For Lulu, we prefer sRGB and CMYK colors. If you’re working in Word, you’ll need to be sure your images are already using sRGB or CMYK. Word will only export at the settings the file comes with.
If your book uses a lot of images, software like InDesign, Affinity Publisher, or even Scribus offers more control over a range of settings, including image quality and color space.
3. Crop Marks
Traditionally, crop marks show where the printers should trim the page. Also called ‘trim lines’, the crops show up in the corners to allow the paper cutter to align and perform a straight cut.
It’s very important to note that Lulu does NOT use crop marks. Our printers use a trimming process based on the book size you’ve selected. If crop marks are present, there’s a good chance the marks will appear as dark lines in the corners of your pages.

So, while crop marks are helpful while laying out your file (particularly in InDesign), you need to be sure to turn them off before exporting your print-ready PDF.
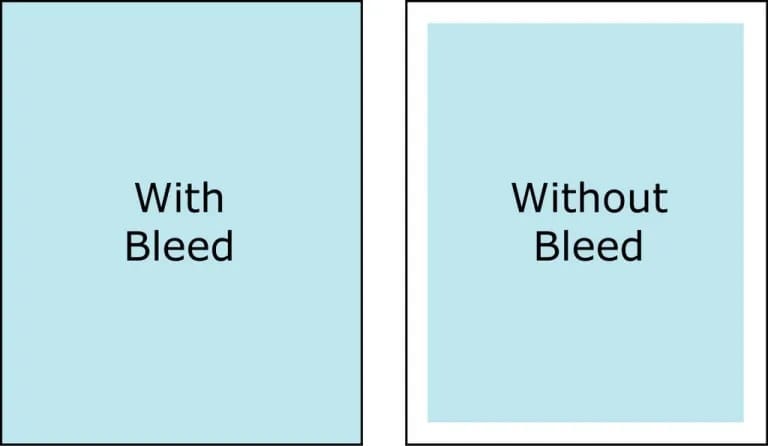
4. Bleed
The bleed is a slightly larger margin applied to the edge of every page to ensure the page can be trimmed to the final size. For most common printers, the bleed is 0.125” on all sides of the page.
If you upload a file to Lulu without a bleed margin, we will add one.

A 6 x 9-inch book is actually printed at 6.25 x 9.25 inches. Once the pages are printed, the 0.125 in on each side is trimmed down prior to binding.
A book file NEEDS to include bleeds if you have content (like images or background color) that extends to the edge of the page. A file that does not include that extra 0.125 in will still be printed with the bleed margin. The result can be pages with a thin white border.
I recommend you create your file with bleeds, no matter what kind of book you’re creating. In Word, this means adjusting your page size and margins to allow for that extra 0.125 in. Other file layout programs, like InDesign, will allow you to set up bleeds when you create the document.
The above image highlights the dangers of printing without bleeds. The edge of the page is the black border, leaving the page on the right with white edges around the light-blue background.
5. Fonts
You may want to use a unique font for some chapter titles. Or for the title and half-title pages. Or even the entire book.
Sadly, using uncommon or paid fonts can present problems for your print-ready PDF. The most pressing issue is that the printer may not own or have the right to use that font. Fortunately, there is a simple way to ensure your fonts render perfectly for printing.
You need to embed all fonts in your file.
The procedure for embedding fonts is different for all programs, but once you have your PDF created, you can use Adobe Acrobat or Reader to view the PDF specifications and verify if the fonts are embedded.
Look under File > Properties > Fonts
The text (Embedded Subset) shows the font has been embedded properly.
Exporting Your Print-Ready PDF
You’ve got your file all set up correctly; now you just need to get it off your design program and ready to upload! For the most part, software today makes exporting a PDF intuitive. Here’s the rundown of a few common tools.
Microsoft Word
We’ve created a variety of in-depth resources to help you make a print-ready PDF using Word.
Important Steps:
- Save your full bleed page size.
- Export with ‘best for printing’ settings.
- Review your PDF carefully.
Adobe InDesign
Adobe InDesign is the most versatile book designer available.
Important Steps:
- Add all preset files.
- Use Lulu Transparencies.
- Export a single-page PDF.
Affinity Publisher
Affinity Publisher is a low-cost, feature-rich alternative to InDesign.
Important Steps:
- Check your color presets.
- Export a single-page PDF.
Print Ready Check
The most important role your print-on-demand company provides is the Print Ready Check. You might even notice it happening; when you upload your PDF documents, we do a thorough check to make certain our printers can print your document.
I hope this helps demystify Print-Ready PDF files and how important it is for you to make sure your file is prepared for printing before you upload it to Lulu or your print-on-demand service of choice.

Paul is the Content Marketing Manager at Lulu. When he's not entrenched in the publishing and print-on-demand world, he likes to hike the scenic North Carolina landscape, read, sample the fanciest micro-brewed beer, and collect fountain pens. Paul is a dog person but considers himself cat tolerant.
Hello Paul, I m not sure where my other comment was. But i found one problem with the fonts. It appears that this character “ë” does not work in italics. Without the italics your programm accepts my pdf , with italics it does not. So now the question is, how do i solve this??
Glad you were able to identify the problem!
The easiest solution is to embed the font. A unique character like “ë” may never embed from Word’s output. Microsoft doesn’t provide the best font embedding, one of the many reasons their software isn’t the best for page layout. So you’ll want to look for a free PDF optimizer like DoPDF to embed fonts.
Hi Paul,
I have printed the document many times as a PDF and the fonts and images come out perfectly. That said, Lulu rejects the book, saying it shows NewTimesRoman font as not embedded even though I don’t use NewTimesRoman. It also Lulu gives the warning that some of the pictures are below 300 dpi and images not flattened. Can we move forward with printing if I’ve had it printed privately with no issues on proofed copies?
Hi Mark,
I’m going to guess that the NewTimesRoman font is a hard return or other ‘hidden’ character. This happens a lot with MS Word documents, but it can be an issue for any PDF. You’ll want to refer back to the software you used to create the PDF to either find and remove the font or ensure all fonts are fully embedded.
You can move forward with printing a PDF with sub-300 dpi images, but we won’t be able to print a PDF with unembedded fonts.
Thanks!
What is your recommendation for creating a PDF of the cover I create?
Hi James,
That will depend on the program you used to create it. All the quality image editing software I can think of has a PDF export option, so that’s what I would look to first. If you’ve just got an image file, you can likely use an online PDF converter like DoPDF to convert.
Hi Paul, will give those suggestions a go, thanks.
On another note, would you know of any open source or affordable alternatives to Adobe Distiller that convert a PDF from Pages / Libre Office / Word into print ready PDFs. Just wondering.
DoPDF – https://www.dopdf.com/
CutePDF – https://www.cutepdf.com/index.htm
I haven’t personally used either of these, but I know other authors who have had good luck with both. Neither will do as much work as Adobe Distiller in terms of comprehensive PDF options though.
Hi Paul. The internet is beyond bad here right now so am unable to reply specifically to your reply (if possible). But thanks so much for replying. So is there any workaround, wherein I make a layout in Pages and somehow end up with a professional looking printout (images and all). I am sure this question is asked a lot, but I am not getting a clear answer. And I’ve been at it a while. Hence I ask. Or should I just accept defat with grace and honour and move on. Thanks again.
Hi Prem,
I checked in with our print team and they said that, so long as you’re using an update to Mac/Apple device and Pages is up to date, the PDF should work. Apparently, we haven’t seen the Quartz issue crop up in some time, but they won’t say with 100% confidence that it’s not still a possible problem.
I suggest trying a test order of a single book to see if any error are thrown back from our printer.
You can also create your file in Pages and run it through Adobe Pro’s preflight/distiller. That should also clean up any potential Quartz issues, though it does mean you’ll need Adobe Pro. There’s some online tools that do this as well (like https://www.dopdf.com/); these are free but usually have a file size limit to convert.
Hi, and thanks for the article. Just wondering if using Apple Pages Is a good idea when it corms to making printable e-books or PDFs. Love their templates, but am worried that the quality of the final outputted file won’t be of the highest or the “right” quality.
Hi Prem,
I like Pages as a writer, but I know there are some potential issues that can arise with printing a PDF created by any Apple product. It has to do with Mac Quartz, a tool Apple uses to help render graphics.
So there isn’t any issue I’m aware of with Pages’ PDF output in terms of design or layout quality. But you may have an issue with Mac Quartz, particularly if you’re using an older version of Pages or Mac OS.
Hi Paul, what a great article! I have a friend that knew I was in the print trade years ago, and hey presto, I agreed to take his usb into a local print shop (after adding a title page and a cover to it) to produce a booklet. The first book I organised for him was ok. Saddle stitched. No pics. His next book had pics and captions. I blundered my way through it till I had a usb with a list of 28 pdfs all in a row for a 28 page book. Felt so proud. Took usb to local print shop. Girl says “there’s 28 files there”. I says “yes, its a 28pp book”! Girl says “you’ll have to make it all one file”. Me, “can you work that into your quote?” Girl, “no we’re not trained for that”.
Please, what’s my next move? I feel like I’ve done 12 rounds with Mike Tyson!
Hi Michael,
I’ve got two ways you can go about combining multiple PDFs into a single one.
Currently you can use Lulu to do this – just create an account, start a project selecting the page size you’re using, and upload all 28 files, and convert to print-ready. That will merge the files into a single PDF. Note that if you continue with Lulu to print, you’ll have to upload the cover separately, so be sure exclude it from the first round of uploading.
Using our converter to merge PDFs is not ideal though. Our system can perform this task, but it’s not designed to do so. You may find the file needs more editing to get it in shape after converting.
The other option is to use Adobe. You would need to have a Pro license or start a free trial to access this feature, but Adobe’s PDF merge is clean and efficient. And since you’ll be using the Pro version, doing minor edits and such after merging is easy.
I would lean toward using Adobe to merge and manage the files, particularly if you plan to do more book layouts in the future it’s worth learning Adobe.
Best of luck!
If fonts in my manuscript is not embedded, how do l embed them?
Thanks
Emma
Hi Emma,
It will vary depending on the software you’re using to create your manuscript and export to PDF. Generally, look for the option while you’re exporting or saving to PDF for ‘print-ready’ or ‘high fidelity’ exports.
You can always reach out to our support team for specific instructions based on your software too!
I just received my first proof from Lulu. The title page is fine, on the first right hand side page, but for the rest of the book the page numbers appear near the gutter, in reverse order, i.e., odd numbers on the left page, even numbers on the right page. The PDF I uploaded, when viewed 2-up in Adobe Reader or Adobe Acrobat Pro (Mac), shows the title page at the beginning of the book on the left side, facing a blank page on the right. From then on, the rest of the book is fine, on my monitor, but printed reversed in the hard copy Lulu proof.
Should I simply remove the blank page that follows the title page, and everything will print fine next time around?
It’s important to remember that a 2 Page View in Adobe Reader/Pro is not accurate to the actual page layout. The first page is always on the right, even though Adobe will display it on the left.
Removing a blank page can be used to correct the layout, as everything after it will shift, but it will change the layout of pages too.
One trick that I use in Adobe Pro is to insert a blank page before the first page. REMOVE THIS PAGE BEFORE UPLOADING TO LULU.
That extra page shifts everything so you’ll be able to see what the pages will look like once printed.
Hi there
I’ve had a fiction formated on Open Office Format and published.Since I’m a novice as far as formating ,PDF are concerned I allowed a veteran writer to format the manuscript for me. Unfortunately when the published book came out , some of the chapters were on the left hand side of the book instead of being on the right hand side.
Is anything that can be done to correct this
error.
Thanks very much.
Hi Koffi,
The page layout will need to be updated in your file, which means fixing the file you supply to Lulu and revising your book to upload that corrected file. To ensure your pages chapters start on the right-side page, make sure those chapter start pages are on ODD pages in the file. This may require using a page or section break to insert a blank before the chapter start.
No matter how many times I tried to embed my fonts, your system rejects the document. The only way I could get my last book accepted was to convert my Microsoft Word Document to Microsoft XPS first, then export to PDF.
Hi Steve,
This can happen if there are unique or paid fonts. Words normal PDF export claims it embeds fonts, but from my experience it is far from 100%.
Your method works great for exporting to a font embedded PDF, as the XPS file conversion is doing many of the same print-ready checks Lulu has to do to prepare the file.
Another great post that inspired me to check the book I’m working by creating a PDF. Nice thing about the PDF is that it shows the pages created by the Word “section break (odd page)” insertion. I found an unwanted SB(odd) insertion and now can not get rid of it. I called Microsoft support and after more than an hour they were unable to get rid of it. We tried many approaches but it will not go away. I thought for sure that putting a section break (new page) on both sides and deleting the SB odd would work, but Word magically transforms the remaining SB new page to SB odd. MS support will call back Monday to see if they can fix this.
Have you encountered this and do you know of a fix? Thanks!
Aha! After no luck with support I found something on the web that solves my problem. By first selecting text following the “section break (odd), and then selecting Format from the menu, and then selecting “document”, the section break can be changed. Still weird that it can’t be deleted by highlighting, or at least bring up the format dialog box.
Hi Robert,
Great workaround! I’ve had similar issues with Word being ‘too smart’ about how it automatically handles section breaks. In a couple of instances, I had to manipulate the page outside of Word (using InDesign) to correct the phantom page.