If you’re publishing and using print-on-demand to sell your book, you know the pain and frustration page formatting causes. Today, we’re going to cover one of the more annoying and (unnecessarily) challenging steps when using Microsoft Word: adding page numbering to your file.
Here’s a tl;dr version, for those of you in a hurry:
Adding Page Numbers in Microsoft Word
- Finishing Writing and Editing
Finalize the content before you do any page layout. You should also add any styling and general formatting before you mess with page numbers.
- Add Breaks
Use Page Breaks for controlling where content appears on the page and Section Breaks to control section-by-section headers.
- Format Header and Footer
Each section break defines a new Header and Footer. Check the settings for all your sections before inserting page numbering.
- Insert Page Numbers
Add the Page Numbers and review each section for proper linking and accuracy.
Step 1: Finish Your File
Do not, under any circumstances, add page numbers before you have finished editing and revising your book. It’s a waste of time and energy. Book formatting is best approached in a thoughtful order; page numbering being among the last steps.
So before you insert page numbers, see to your page layout design. That includes formatting your text, adding styles, setting your page margins, and any images or graphics. Create and add all the front matter and back matter too.
Finally, the last part of formatting your book design ties directly to your page numbering: adding breaks. That’s our next step, but first, turn on Reveal Non-Printing Characters.

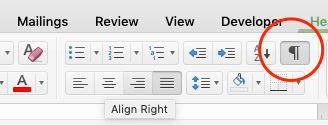
Non-Printing Characters include spaces, returns, and breaks. You’ll want these revealed so you can properly add breaks to your file.
Step 2: Add Breaks
Breaks—Page Breaks and Section Breaks—divide the page dynamically, so that when you export your PDF for printing, the spacing will stay uniform.
Please, NEVER use hard returns to create space on the page.


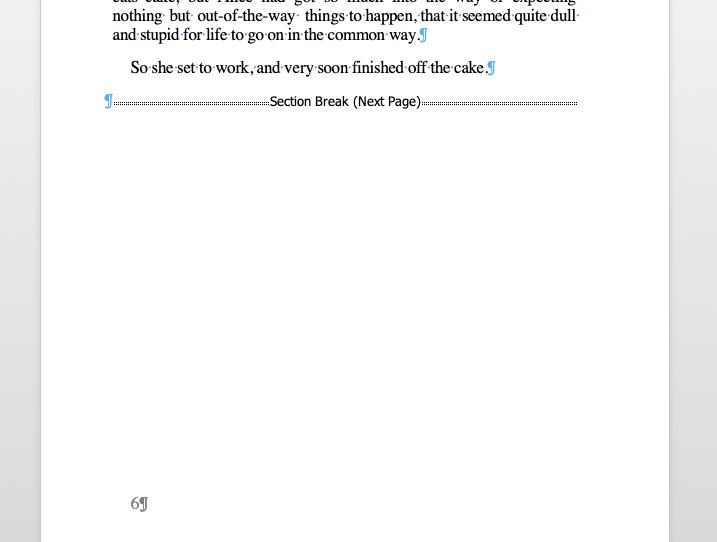
Breaks will allow you to segment and section your file. Importantly, breaking your file into sections allows you to control which pages have page numbers.
Think about it; have you ever bought a book that has a page number on the very first page (the title or half-title usually)? Go grab a couple books off your shelf and have a look. I’ll wait.

I’m guessing you found that the front matter didn’t have any page numbering. Then you get to the first official page of the book and the page numbering begins at 1.
Page Break
Inserting a Page Break tells Word to stop adding content and move to the next page. Simple as that.

If your book uses the same numbering style for the entire file and you don’t have unique header content, add a Page Break at the end of every chapter to start the next chapter on a new page.
You Might Also Like:
Section Break
Word has four kinds of Section Break you can use:
- Section Break (Next Page) – starts the new section on the next page
- Section Break (Continuous) – starts the new section on the current page
- Section Break (Odd Page) – starts the new section on the next odd page
- Section Break (Even Page) – starts the new section on the next even page
Use the ‘Next Page’ Section Break until you’re very comfortable with Word formatting. A Section Break (Next Page) works exactly like a Page Break with one addition—the file is split into a new ‘section’ on either side of the Break.

Use a Section Break (Next Page) to make each chapter a unique section of the document. You’ll have the control to add unique content for the Header (like chapter titles) for each section.
Step 3: Format Your Header and Footer
Word offers a lot of options to format the Header and Footer. With all of your breaks added, start with the first section and work sequentially to update the settings for the header/footer in each section.

- Link to Previous – This setting defaults to being ‘ON’ so you have to check it for all your sections. If selected, the header and footer will link to the header and footer in the previous section. If you plan to add unique content for each section, you must turn off Link to Previous for all sections.
- Different First Page – A lot of authors like to leave off the header and/or footer on the first page of a section. Check this box and you’ll be able to format the first page of the section separately from the rest of the section.
- Different Odd & Even Pages – If you want to have different content on the odd and even pages (like a title on one side and author on the other) you need to check this option.
Step 4: Insert Page Numbers
If you just used page breaks to separate chapters, you’ve got it easy.
Head to the first page you want your numbers to appear on (probably the first page of the first chapter) and double-click on the footer. While in the footer, the ribbon should swap to the header/footer menu and you’ll see the ‘Insert Page Numbers’ button.

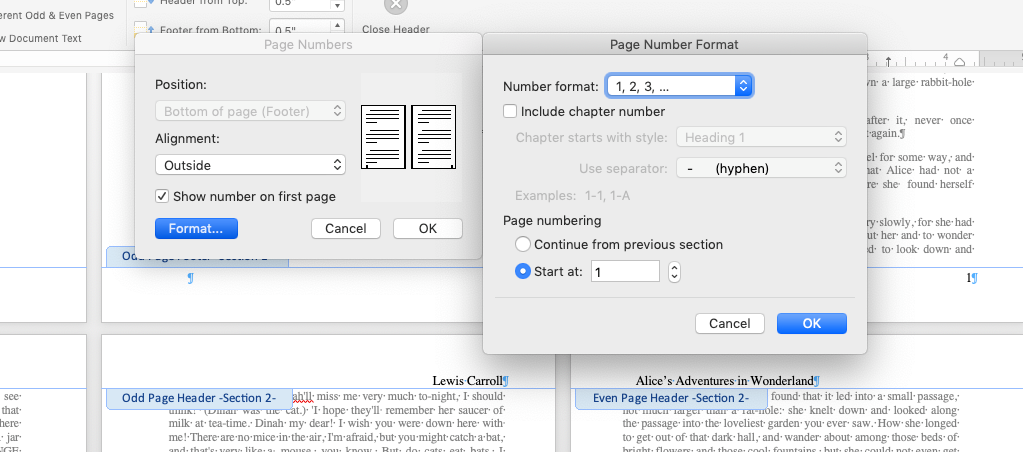
Here we see the Page Number menu and the Format… menu opened beside it. Select the alignment for your page numbering. Also set the Start at: to 1 so that the page I’m currently on will show ‘1’ in the footer. Click ‘OK’ for both menus and your page numbering will appear in the footer.
Be sure to close the header and footer (just double-click in the body of your page) to see how the page numbering will look.
If your chapters will have unique content in the header, you’ll need to insert section breaks at the end of each chapter. With that done, add page numbering to the first section. For each successive section, you’ll need to change the formatting when you insert the page numbers: select Continue from the previous section in the Page Number Format menu.

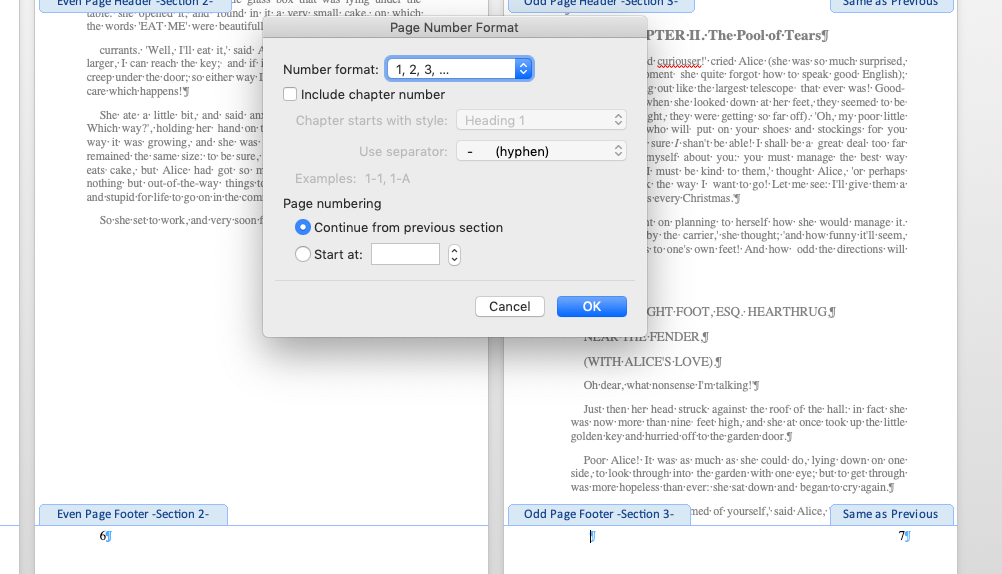
This will link the page numbering independently of the Footer linking, allowing us free to edit the Header/Footer for other content without breaking the page numbering.
Simplifying the Complex
The best way to keep page numbering simple is to do it last. This gives you the freedom to design the pages of your file without having to set up a section and ensures once you get to that step, there won’t be any additional changes to disrupt the page numbering.
Microsoft Word’s method of page numbering is much more challenging than tools like Adobe InDesign or Affinity Publisher—but these publishing programs are designed for more complex book layouts. Microsoft Word is primarily a word processor and will always struggle to match tools like InDesign for page layout.
Last note: if you’re looking at Word and what you see doesn’t match the screenshots in this article, it’s likely because your version of Word and mine are not the same. Microsoft (infuriatingly) has a tendency to change the layout and location of various commands when they update the Office software. You may need to refer to their help pages for information about your version of Word.
Book Design And Print-On-Demand Services
Once you’ve got all your pages numbered and you’ve added header content, the last test is to export a PDF for printing. Most print-on-demand companies require a PDF to print. I would be very skeptical of a printer that DIDN’T require a PDF.
Finally, once you’re satisfied with your layout in Word and the PDF looks good too, you’re ready to make a print order for a proof copy to see how the book (and your page numbering!) will look in print.

Paul is the Content Marketing Manager at Lulu. When he's not entrenched in the publishing and print-on-demand world, he likes to hike the scenic North Carolina landscape, read, sample the fanciest micro-brewed beer, and collect fountain pens. Paul is a dog person but considers himself cat tolerant.
Thank you for sharing. The fact that you illustrated the steps made it easier to understand.
Published author both in print and eBooks, but I was stuck. Perhaps it was just reading yet another comment on how to put together pagination for a print book but your explanation finally was a breakthrough. Unchecking “Different Odd and Even Pages” allowed the page numbering footer to merrily number all the pages, not just the odd ones so quickly I was left sitting, staring at my manuscript, wondering why, for the past three days, I have not realized that was the way to do it. (Realization came: the instructions I’d read on alternating headers had then said, “And do the same for your footer” but hadn’t added “…except for the Different Odd, etc.” I’ve been working with Word since 1997 but this had me stymied. Thank you.
I have finished a large, richly illustrated book in A4 format. I set up each chapter manually in Word, without page numbers. When I insert page numbers using what I take to be the correct usual method so that the book will be correctly paginated throughout, all my careful layout disappears, which appears to be because setting up the footer reduces the page size. How can I avoid this?
One of my colleagues sent me a document like this in 2017, that is numbered exactly like this. When I need a new document I have to overwrite the old one, because I cannot reproduce myself. Is it possible to send one to you and figure it out by reverse engineering it?
Unfortunately, we’re not able to pick apart Word files to understand the formatting. From the research I’ve done on Word’s support pages, they don’t indicate they support this kind of unique page numbering by default. I’m thinking the original document might be using a macro or script to apply the page number set up you’re after.
If that’s the case, you’re likely best off using the original document to make a template and utilizing that for future docs.
Ok I did that but the numbering is continuous. I want only the number of sheets and not the number of pages to appear in the odd pages
You may have to manually insert the sheet numbers. I’m not seeing an option for Word to number by sheet, so the automatic page numbering will just keep plugging in the odd page numbers, rather than the sheet number.
Is it possible to number only the sheets of a document instead of pages? For example in page 3 I would the header to be numbered as “2nd sheet”, page 5 as “3rd sheet”, page 7 as “4th sheet” etc.
Absolutely! Word has a setting for ‘different odd and even’ pages. If you utilize this, you can add header/footer content just to the odd pages and leave the even blank. Just be sure to carefully review your file and remember that the odd pages will be on the right/even on the left when the book is printed.
What is the proper numbering:
1. 2. 3.
Then a. b. c.
Then. I, II, III
???? Need to know all levels for a process document.
V/R,
Tech Writer
Hi Candus,
I think this can vary based on specific document requirements and standards. In general, I’ve seen roman numerals (i, ii, iii, iv) used for introductory pages like a foreword and introduction. From there on, 1, 2, 3, 4 are normally used, with a, b, c, d used to denote subsections.
How can I make sure each chapter title comes out on an odd page, right side, because some chapters are longer than others and so sometimes the chapters end up on an even page?
Hi Jackie,
There are two ways you can do this. The first is to manually adjust the spacing between paragraphs or at the end of pages to force some of the chapter on to the next page. This will eventually shift the next chapter’s start from an even to an odd page.
The alternative is to use a second Page Break at the end of the chapter to force the next chapter onto an odd page. This is the easiest way, though it will leave a blank page opposite the chapter start, which isn’t always desirable.
Also, be sure when making updates to the spacing or adding breaks to start from the beginning and work forward. Each shift will impact the contents on the subsequent pages, so you’ll want to carefully review the pages after making changes.
hi, this is a kind of tricky question. I have a very long manual, with several sections. I already Managed to number pages according to the section brakes, so that each section starts with page 1, and the page number indicates section and number, e.g 3-2 means section 3 page 2.
For reasons related to regulatory specifications I’m being required to numerate the pages in absolute order. There is no way i would loose the section-page format, but would like to number absolute page numbers in the footer.
I haven’t found a way to tell word to disregard section separation in the footer page numbering. Any Ideas ?
(other than creating 2 different versions)
Regards
Hi Jorge,
If you just need to have absolute page numbering, you should be able to link the sections together (Link to Previous in the command ribbon when you’re in the footer). Then you might need to format the page numbering to link as well, or just delete the page numbering and insert again with the sections linked.
There are a few issues you might run into. For one, linking footers sections can interact poorly if you’re trying to keep the header sections unlinked. Likewise, there is no way to prevent page numbering on a specific page without starting a new section and marking it with Different First Page.
But to simply switch to a running page number for all pages, Link to Previous should do the trick.
THANK YOU!!! WHY WHY WHY can’t MS write instructions with this kind of clarity??! I desperately miss the old Que Publications user manuals. they were like this: well-worded, succinct, and well illustrated!
Thanks MAC! I couldn’t agree more. It would really be nice if Microsoft had some thorough instructions so that we all didn’t have to figure out how to use their software.
Paul, I am working with newly purchased Mac Word version 16.33. I am trying to page number one-half of a physical page as page one and the second half of a physical page as page 2, etc. All of this is in landscape. Any help would be appreciated.
Hi Ken,
That’s a difficult scenario to navigate in Word. I’m assuming there is something within the body of the page that separates the page 1/page 2. Most likely, the only option will be to manually add page numbering to every page.
The only way I can think of off the top of my head to achieve this would be to insert a text box for the second number, allowing you to control where it appears in the footer. That should work for print, though you’ll want to really scrutinize your print-ready PDF to be sure everything lands in the right spot.
Best of luck!
Paul, My recipe book does not have chapters. I have the usual front matter, a table of contents (hand-made, not created by Word) followed by the first recipe. So, I don’t have any headers or footers. Under step 4: How can I double-click in a footer to open the footer? Appreciate any advice.
Hi Nancy,
In MS Word, you can click near the top or bottom of any page to open the header/footer respectively. Also, depending on your version of Word, you may have an option under the Insert menu to insert a header or footer, which will add them to that section of the file (so all pages in your section) and open up the header/footer for editing.
Hi,
Thank you for your post!
Is it possible to put both odd and even page numbering on the top left corner of the even page? So that, for ex. you have 2-3, 4-5, 6-7, …, on the even header and nothing on the odd header?
Alexandra
Hi Alexandra,
You should be able to do this by using the ‘different odd and even’ page options. Unfortunately, it does not look like Word can automatically fill page numbering like this, so you’ll be manually inserting the even header for all those pages.
sorry, it shows as @p on each page
Hi Hans,
Sadly, that’s not an error I’m familiar with. I think the best thing to do would be to delete the page numbers entirely and insert them again. If that doesn’t work, you may want to contact Microsoft Support to see if they have any advice (the contact link is way down the bottom of the page).
Absolute worst case scenario, you can reformat the entire document by removing all breaks and formatting, copying the text into a clean/new doc, and starting over with the formatting.
When I insert pagenumbers the document onkly shows #p on each page. How to fix this?
Everything I have read on various web sites seems to think that appendices need to have page numbers. This is fine if your appendix has content in it. However I write documents that have appendices that do not have any content in the Word file. I take the Word file and print it to PDF where I then use Adobe DC to insert other information like a manual on a boiler or pump etc. These may have over 50 to 60 pages in. This is why I am not numbering the appendices but am book marking them separately and creating two contents sections on the first page.
Hi Andrew,
I was surprised to see writers and experts advocating for page numbering appendices as well. For the design you mentioned, I think it makes perfect sense to leave off the numbering and construct the file your own way. Luckily, when you create the book entirely on your own and use print-on-demand, you’re the boss and can make the book however you’d like!
thanks for your post…much clearer than the Word manual. I never thought about waiting until you finish before inserting numbers but I can see why you are so emphatic about that point and will heed your advice.
Great rundown! Long ago I learned a hard lesson in using returns instead of a page break. I never made that mistake again.
Also, I use a new Word file for every part of the book: the first pages with title and copyright info, the introduction (if any; pagination in Roman numerlas), the body of the text, then a final section with “about the author” and – if I have extra pages – promos for other books. This way if I find an error in the final completed PDF made at the LULU site, I need only slug in the replacement section. This rarely interferes with the pagination which I continue from one file to the next if needed. If it does, and it creates a new page, I will just edit that section more to tighten it up. Saves plenty of trouble!
When I reproduce an old book in facsimile form, such as the King Curio Catalog #81 I don’t use Word. I make hi-res scans of the pages then I slug them into the pages using an InDesign or VivaDesigner template that I have devised. These design programs have the advantage of easily allowing for digitally cleaning up the files as well. This is important with a book that may be 80 years old.
“Roman Numerals”! See what I mean about typos?
Great article on page numbering! Thanks! Question: since my author and I are currently using Word 365 with all the continuing problems, and since we are about half way through revising a 300 page book with lots of charts, pictures, and checklists, would I be better off switching later on to Scrivener or Google Docs? I suspect the author, 80, won’t be up to learning a new bit of software (so I’ll have to keep going with Word for a while), but I would switch if it makes sense to do so.
Thank you Robert, I’m glad you enjoyed it!
Unfortunately, for a work with charts/images and the like, Docs and Scrivener aren’t much better than Word. I actually recommend either InDesign or Affinity Publisher to do more dedicated page layout involving so many elements.
But if you’re comfortable with Word, you may be best served sticking with it.
Perhaps worth noting: a few years ago I created a book template for typical 6×9 books, refined it working with a professional book designer (this was part of The Librarian’s Guide to Micropublishing, published in paperback by Information Today, Inc–and in hardbound at Lulu, using the template and the same body PDF for both) and made it freely available. The template’s at waltcrawford.name/bk6pvex.dotx, and links to it and an “example template” version are at waltcrawford.name/lgm. Entirely free for use. Feel free to copy, modify, rename, post elsewhere. Easy to modify for your preferred typefaces, etc. The template uses Palatino Linotype as a body type and Verdana for most headings. [I’ve published more than a dozen Lulu books, most using a variant of this template.)
Awesome template Walt, thanks for sharing!