How to Make a Custom Calendar for Your Wall
Print-on-demand calendars are a great way to promote your business or brand, whether you're an artist, photographer, or any kind of content creator. In this post, I'll walk you through the process of creating a calendar using Lulu's Calendar Creator, from selecting your images to previewing and printing your finished product.
Because you’ll create your wall calendar with Lulu’s print-on-demand, you won’t need to purchase calendars upfront. All your books and calendars are printed as they’re sold, saving you money and simplifying your business.
Creating a Calendar
Lulu calendars are printed using 100# paper and Premium Color ink. The binding is a ‘wire-o’ wound through the top of the page, with a hole pre-punched 0.25 in from the top.
Creating a custom calendar with Lulu's Calendar Creator is easy. Just follow these steps:
- Go to Lulu.com and create an account
- Create a New Project and select Calendar
- Upload your images and create events
- Select a theme
- Preview your calendar
- Publish and start selling!
Starting Your Calendar
If you’re building your own calendar and just want to print it, go to our Calendars page to grab one of our templates to get the specifications and size right.
To start creating your calendar, sign in to your Lulu account and create a new project. Select Calendar from the product options. Then give your calendar a name, and select the language and category.

If you plan to sell your calendar in the Lulu Bookstore, it’s important to find the right category. Shoppers will be able to sort by calendar, so the genre category you pick will be key in helping them find your work in our store!
If you’re selling your calendar on the Lulu Bookstore, you’ll need to complete all the steps for copyright, details for your calendar, and assigning a payee. Proper metadata is important when publishing your calendar and will help your fans find your calendar when searching online.
On the Design step, you’ll see the option to Create a Calendar or Upload a Calendar.
Create a Calendar is the simplest method—you upload images for each month (and the front cover) to create a calendar. Or you can download one of our templates and use InDesign or your favorite design software to Upload a Calendar designed entirely by you.
Create a Calendar
This is the option that makes calendars easy to create. You’ll start by selecting 12 or 18 months and the start date.
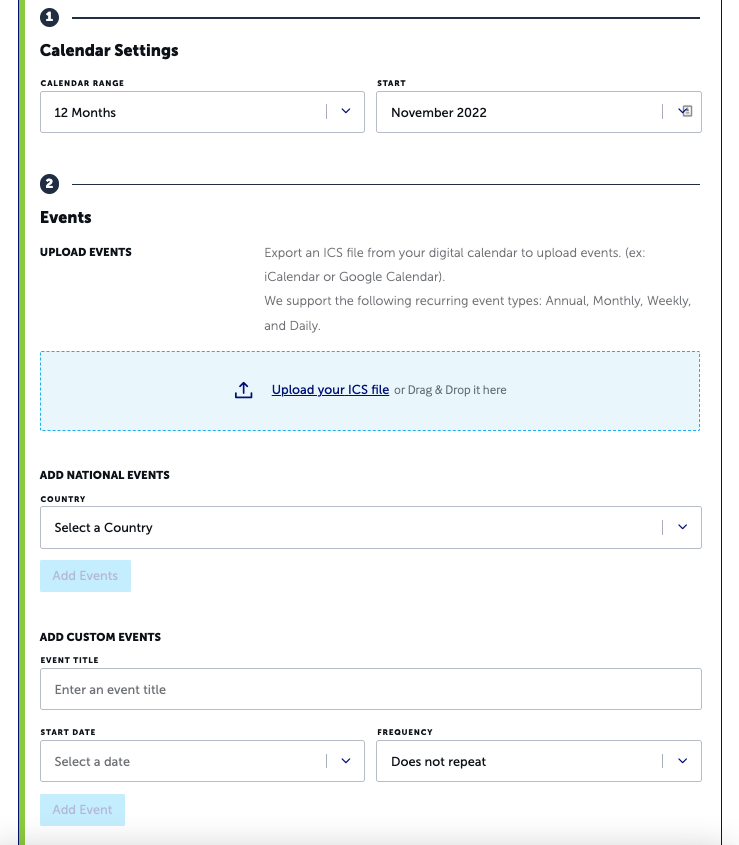
Next, you’ll add some events. These can be standard national holidays or custom days (like birthdays) just for your calendar. To make that easy, you can download events from your favorite calendar tool (like Outlook, Google Calendar, or iCalendar) and upload them here as an ICS file.
Once you have the events ready for your calendar, upload your images for the front and back cover, as well as one image for each month.
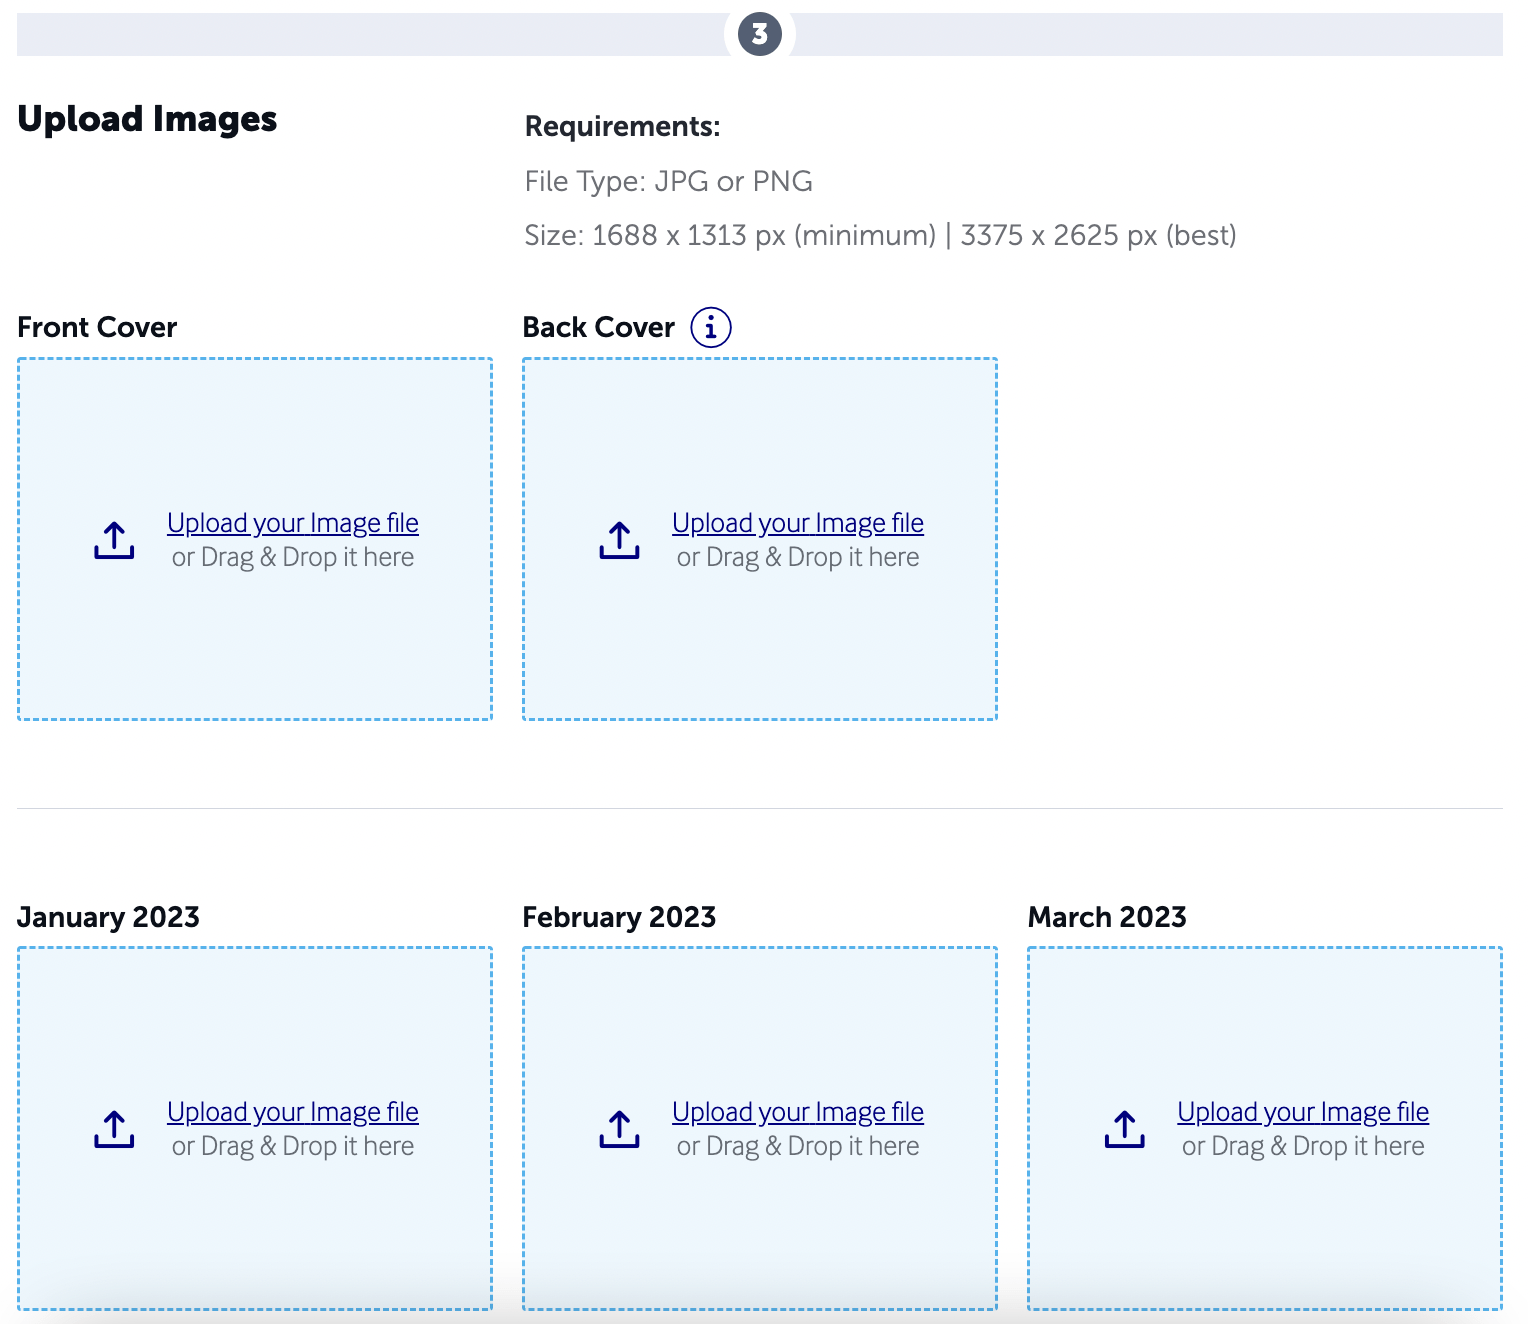
Upload all your images and select from one of our four themes to complete your calendar.
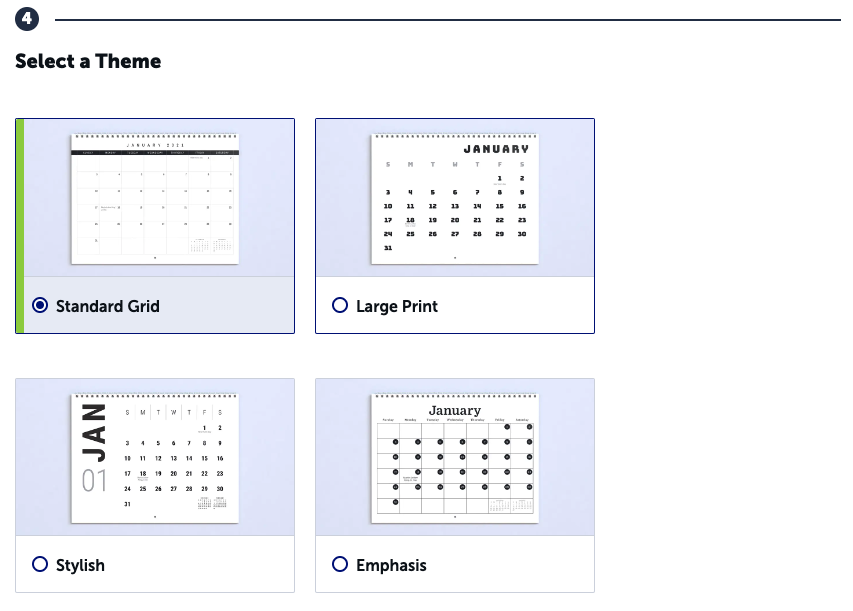
And that’s it! Hit that ‘Create Calendar’ button and you’ll be ready to preview the calendar and finalize any details before publishing!
Upload a Calendar
Your other option is to upload a calendar you designed, using our calendar templates to get the page size and month grid set correctly.
We offer preformatted templates for 12 and 18-month calendars you can use with your favorite design program to make an original calendar. Just select the option to upload your calendar, download the template, and design your calendar.
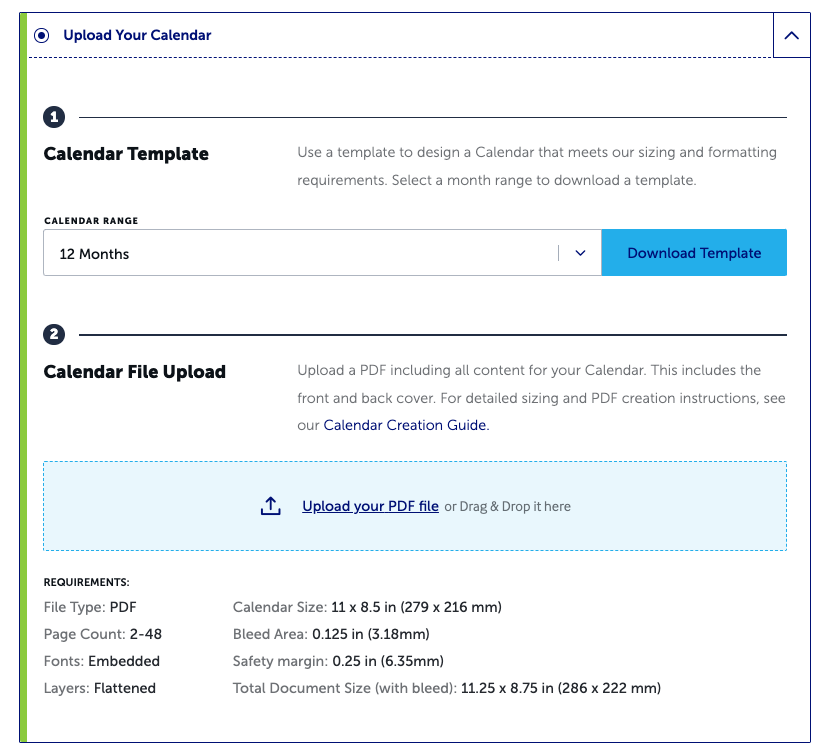
This option is perfect if you want to create a custom grid or add unique elements to your design. Just be sure to respect the specifications and bleed/safety areas so none of your content is trimmed or misaligned when we print your calendar.
Preview Your Calendar
Once you’re done using either method to create your calendar, you can use our preview tool to make certain your calendar is ready to print.
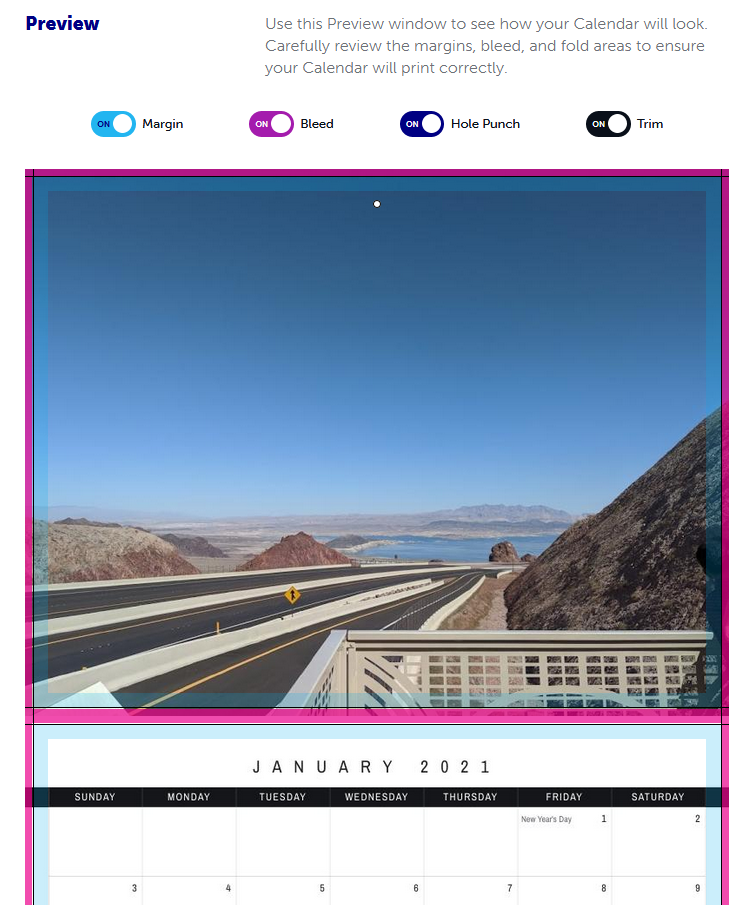
The preview is terrific for catching errors, but I cannot stress enough how important it is to order a printed copy to review, too. If you’re planning to sell your calendar, this is even more important.
Calendar Image Specifications
The image frame is 11.25″ wide x 8.75″ high (with the bleed included). That equals 3375 x 2625 pixels. To ensure high-quality printing, your image’s resolution needs to be between 300 and 600 pixels per inch (PPI). The minimum size for your image is 1688 x 1313 pixels, so be sure your images are at least that size.
Review our Image FAQ on the Lulu Help Center for more detailed information and answers to common questions regarding images.
Selling Calendars: Monetizing Your Content
Many people use Lulu to create personal calendars (me included) and simply print a single copy or a few copies each year.
But lots of talented photographers and artists make stunning calendars and sell them! Not everyone wants to make their own calendar, but we all still use calendars. Even with smartphones in everyone’s pockets, wall calendars are as popular as ever.
If you’re interested in selling your calendar, there are two great ways to do so:
- The Lulu Bookstore
- On your own website with Lulu Direct
Selling Your Calendar on the Lulu Bookstore
To sell your calendar on the Lulu Bookstore, all you have to do is publish it. Select General Access on the last step (after publishing) and publish to the Lulu Bookstore. In a matter of moments, your calendar will be listed and available for sale. You can also use Select Access to create a product page, but keep it private and only share the link with specific customers.
When someone buys your calendar from the bookstore, you’ll earn 80% of the revenue. You’ll be able to adjust your revenue amounts while publishing, and you can always update them by revising your project.
Selling Your Calendar on Your Website
If you’ve got your own website or want to build one, Lulu can connect directly using Shopify, Wix, or WooCommerce. Using these ecommerce platforms, you can sell your calendar on your own website, and Lulu will print and ship it for you.
This option is terrific if you have a site and want to point your buyers there (rather than the Lulu Bookstore). You’ll earn 100% of the revenue from each sale, and Lulu will still handle the printing and shipping for you!

Sell Your Book, Your Way
Sell books on your Wix, Shopify, or WooCommerce website with Lulu Direct.
Or use our Order Import tool for your next book launch.
The Benefits of Creating a Custom Calendar
Custom calendars are a great way to promote your business, brand, and content. You can use your calendar to showcase your work while providing your fans with a useful product.
Calendars make great gifts, too. Your biggest fans will want a copy for their own wall and extra calendars to give to their friends and family. Don’t underestimate the opportunity to expand your audience through word-of-mouth.
Finally, you’ll generate some income from calendar sales. Sales might not be the primary reason for publishing your calendar, but making money from sales is an important part of your business. A calendar might be the reason a new fan finds you, or it might be a regular purchase your most dedicated fans will seek year after year.
Lulu's Calendar Creator makes it easy to create and publish your own custom calendars. With our print-on-demand service, you can sell your calendars without worrying about inventory or fulfillment. Start creating your own custom calendar today!


