Using Microsoft Word for Your Book Writing & Formatting
Ah, Microsoft Word. The software has become synonymous with writing and page layout.
Every aspiring author who even imagines writing and publishing has, in one way or another, experienced MS Word. Microsoft Office introduced Word back in 1983, making it over 40 years old.
During its long tenure, Word has set the bar for word processing, editing, and page layout for millions of authors.
While today there are a lot of other options for writing your book, Word remains an effective and affordable tool. But when it comes to page layout, the Word of today doesn’t have the features and options most creators will need.
Finding the Right Version of Word
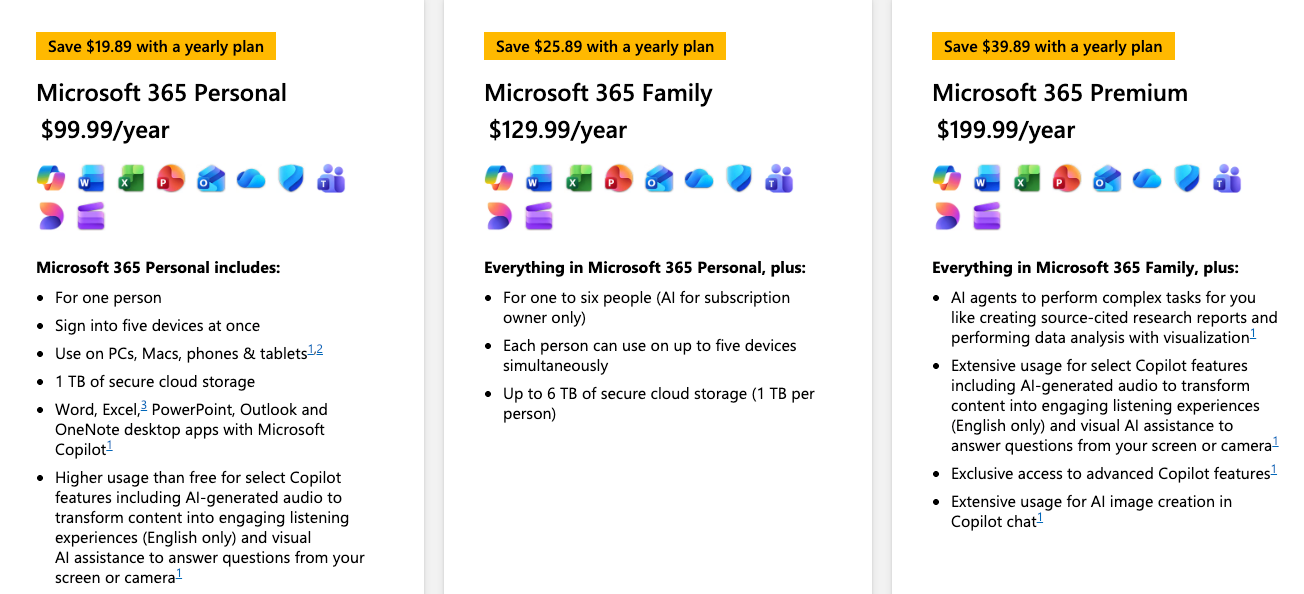
There are essentially three different versions of Word available today. Each version has its own pros and cons. I encourage you to look at Microsoft’s own comparison of the free web version and the paid desktop version.
- Word Free Online - Word for the web is free to use at word.cloud.microsoft. You’ll need to create a Microsoft account. Word will run in your browser and save your files to OneDrive. While this version is nice for writing, it lacks the full functionality of the other options.
- One-time Purchase - This is a one-time purchase (sometimes called a "perpetual license") for what is essentially Office 2024. Home and Student starts at $149.99 and includes Word, Excel, and PowerPoint. You pay once, install on one computer, and own that version forever. The downside is that you’ll be locked to that version and won’t get updates from Microsoft.
- Microsoft 365 Subscription - This is the broad, online suite that Microsoft is fully supporting. Pricing is annual and great if you’ll use all of the tools regularly. The subscription version also includes a desktop app, which offers the layout and formatting tools the free version lacks.
Today, we’re going to focus on Word’s free, online version.
If you choose to pay for a subscription to Office online, you’ll get access to the desktop app. The biggest benefit for authors is that you’ll have better page layout control with this paid version. The free version of Word is more suited for writing a book than formatting one.
For books with more complex designs, you’ll want to use something like Affinity (for free), Scribus (if you like open source), or Adobe InDesign. Even the paid versions of Word won’t get you the page layout options these true design programs offer.
But! If you’re looking for a tool to write, edit, and do a simple page layout (like a novel or memoir), Word is more than sufficient. Even the free version.
Setting Up a Microsoft Word Account
Access to Microsoft’s online suite is free with an account. Once you’ve created an account, you’ll see a basic search screen for all Microsoft products.
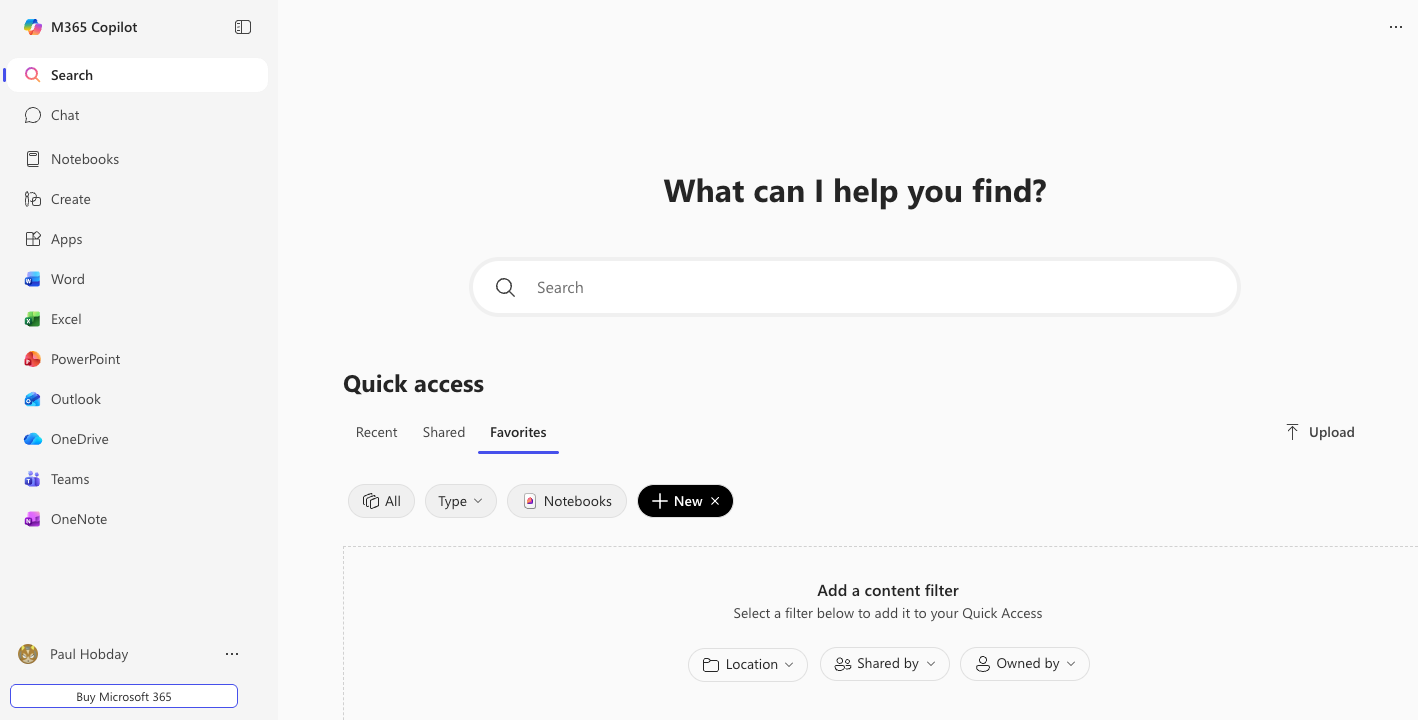
This is a nice way to access anything you’ve created in the Microsoft environment. You can search your OneDrive and select from the available apps.
Not everything will be fully available for the free Microsoft version. Specifically, you won’t have the Chat or Notebooks options (apps powered by Microsoft’s Copilot AI). Again, not necessary to use Word for your writing and formatting.
To open Word, click the icon for the app. You’ll see a new tab with the Word home screen.
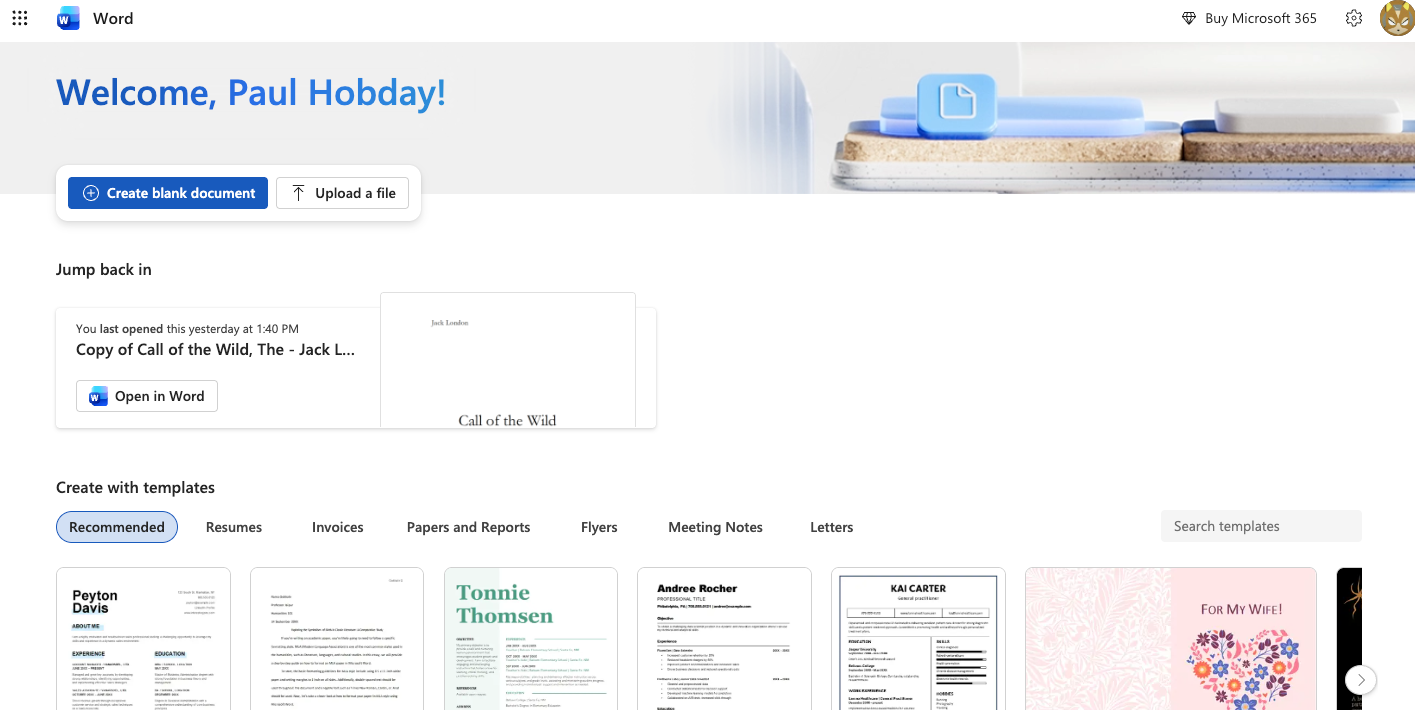
Now you’re ready to start a new file or upload an existing one! For our examples, I’m going to use a public domain version of Call of the Wild by Jack London.
Writing in Microsoft Word
At its core, Word is a writing tool. It offers a variety of basic templates for things like resumes, trackers, invoices, and meeting notes. But really, you’re probably just going to create a blank template and work from there.
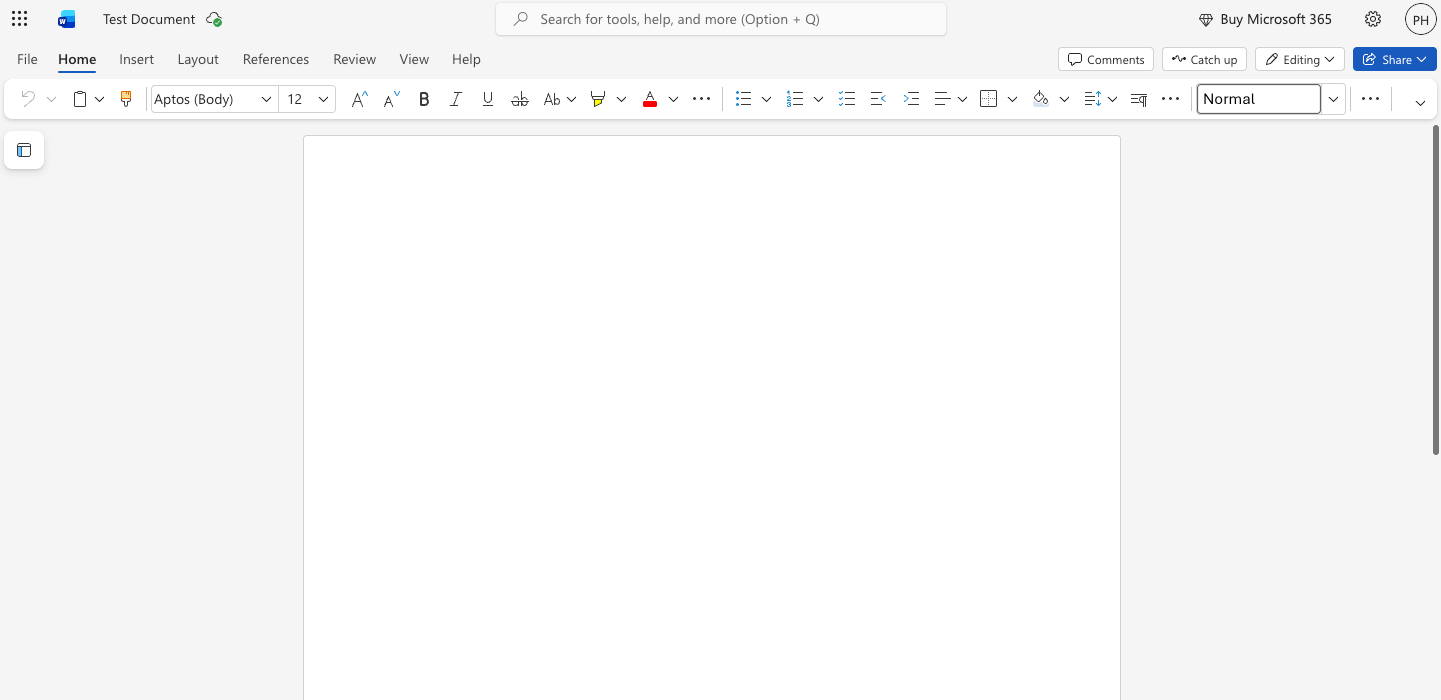
This should look familiar. While lots of little things have changed and evolved, the writing space paired with a ribbon of commands is THE model for word processors. Google Docs layout mirrors the design Word popularized, just like almost every other writing platform out there.
The modern version of Word online gives you all the most important tools for writing:
- Fonts & text sizing
- Styles
- Lists, indents, and line spacing
- Header & Footer
- Paragraph-level formatting
You will be limited to a few free fonts, but the list is still quite long and includes many of the most common fonts for books. Other than that, Word’s free online version has everything you might need to write a book.
It’s also worth noting that Word has free Android and iOS apps. They offer limited writing and editing abilities, but are pretty nice for a quick note or to reference a document while away from your computer.
Editing with Microsoft Word
Word is the original platform for tracked changes, though WordPerfect did technically have a redline & strikethrough function first. What Microsoft created in their commenting and in-line editing options set the gold standard. We still basically use the same functionality (alongside cloud-stored files) to collaboratively edit text in real time.
By default, your document will be in ‘Editing’ mode, but you can switch to ‘Reviewing’ to manage tracked changes, leave comments, and review spelling & grammar. There’s a quick switcher via a dropdown on the right side of the ribbon. Or you can click the ‘Review’ tab to see reviewing options while still in Editing mode.
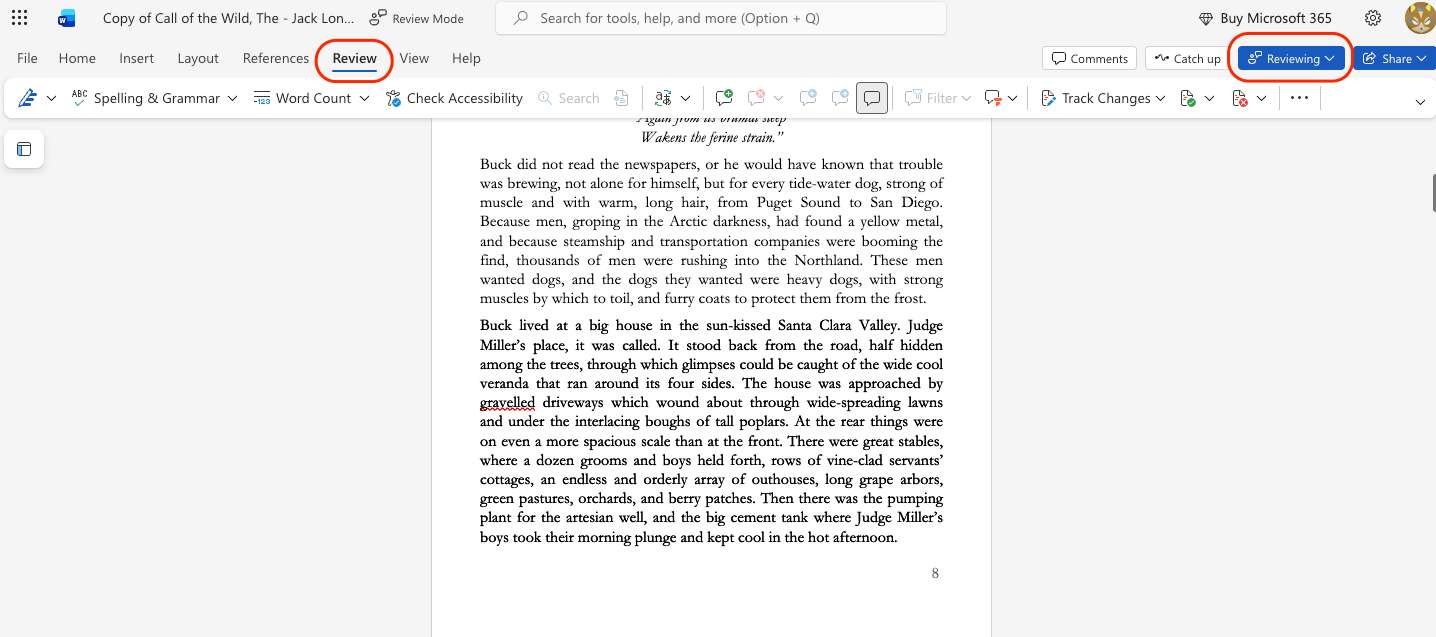
Editing in Word is probably its best feature. Even with the desktop version, you can save the file to a cloud service (OneDrive is Microsoft's and works best for Word documents) and add collaborators to edit the file with you. This is perfect for bringing in an editor and having a back-and-forth about updates.
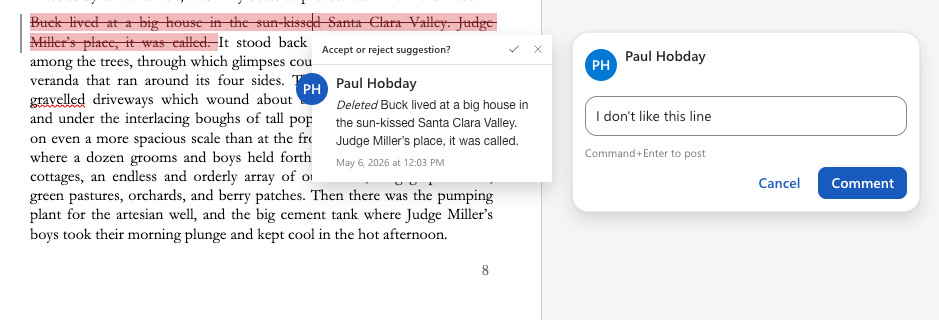
Deleted and edited text is retained until the edit is accepted. Alongside that editing, you can leave comments tagged to specific pieces of text.
Microsoft also has a really good spelling and grammar checker (better than Google Docs in my opinion). If you’re a fan of more advanced checkers like Grammarly, you can still use that as well (since Microsoft 365 is accessed through a browser).
 Paul
Paul
Text Formatting & Page Layout in Microsoft Word
I mentioned this earlier, but I’m going to say it again: Word is not meant for or very good at complex page layout. If you’re writing a resume to be printed on a couple of 8.5 x 11 sheets of copier paper, it’s just fine. Great, even.
I’m going to use the rest of this post to show you how to manually use Word online’s features to set up your pages. If you’re using a desktop version of Word, either the one-time purchase or subscription, you’ll also have the option to use our free templates.
The web browser version of Word will not accept these files for editing.
For a novel or memoir, Word is still pretty good. So long as you don’t need complex headers or footers, have a ton of images, or need varied page layouts, you can probably do what you want in Word.
Word’s Page Layout is Good For:
- Novels
- Memoirs
- Poetry or Short Story Collections
- Projects with minimal design/formatting
Word’s Page Layout is Bad For:
- Magazines
- Children’s Books
- Manuals
- Projects with heavy design/formatting needs
What you can do in Word is adjust page size, margins, and styles. That means you can set your page to match your book’s size, adjust margins to ensure printing is accurate (no text running off the page), and define text size, font, and position.
The very first thing you’ll do before working on your page layout is to reveal any hidden characters in your document.
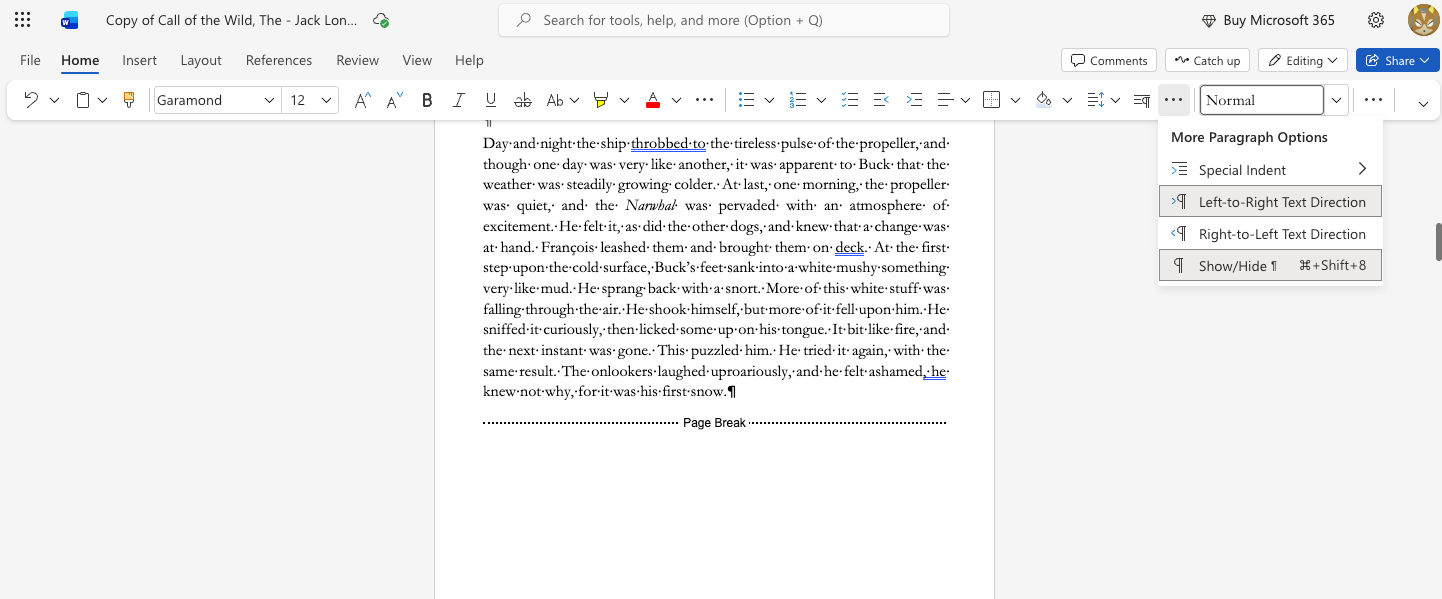
It’s annoying to find. The ribbon will change what it shows or hides based on your screen size, and it often will be tucked into a sub-menu.
What this option does is reveal EVERYTHING in your document. Note in my screenshot the dots between words, the pilcrow symbol at the end of the paragraph, and ‘Page Break’ text. These are all hidden characters that Word naturally hides to make it easier on you while writing.
These characters are, essentially, your formatting.
With your characters revealed, you’ll do almost all of your formatting work in either the ‘Home’ or ‘Layout’ menus (from the ribbon).
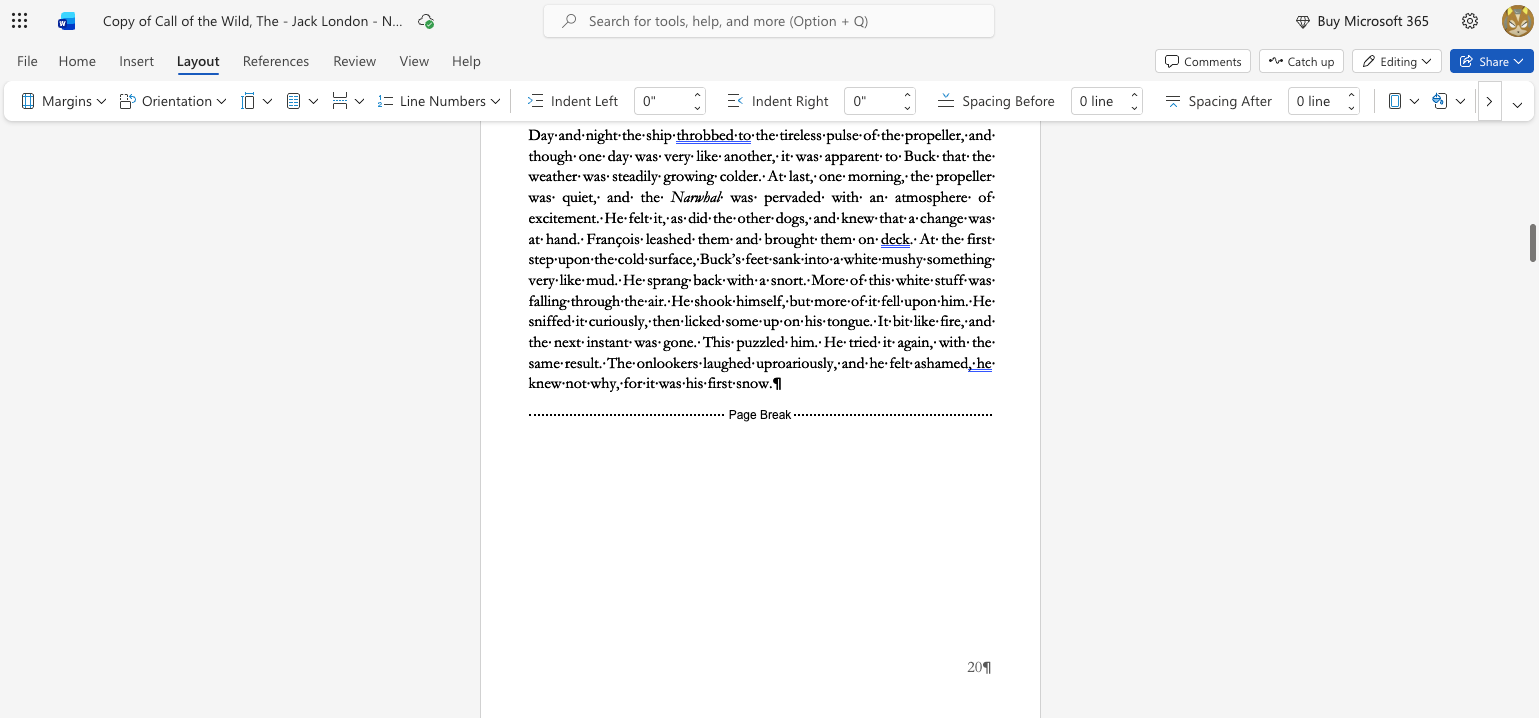
The Layout menu is how you control the page size, margins, orientation, and line spacing. Word does a good job of keeping this fairly simple while including enough functionality to prepare a file for printing. Here are the key layout factors:
- Page size that matches your book size (including bleed)
- Margin space to prevent text from running off the page or appearing crowded
- Text layout, like size, spacing, and indents
- Page orientation and breaks
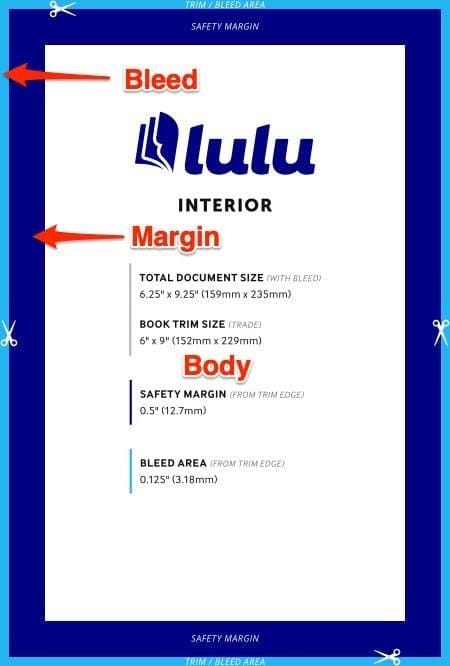
One key thing to note here: Word doesn’t have an option to add a bleed margin. The page sizes they offer are ‘finish’ sizes—the actual size of the page. But for printed books, pages are oversized and cut down to ensure they’re uniform. You’ll want to manually adjust the page size and margins to include a bleed margin before you export your PDF.
 Paul
Paul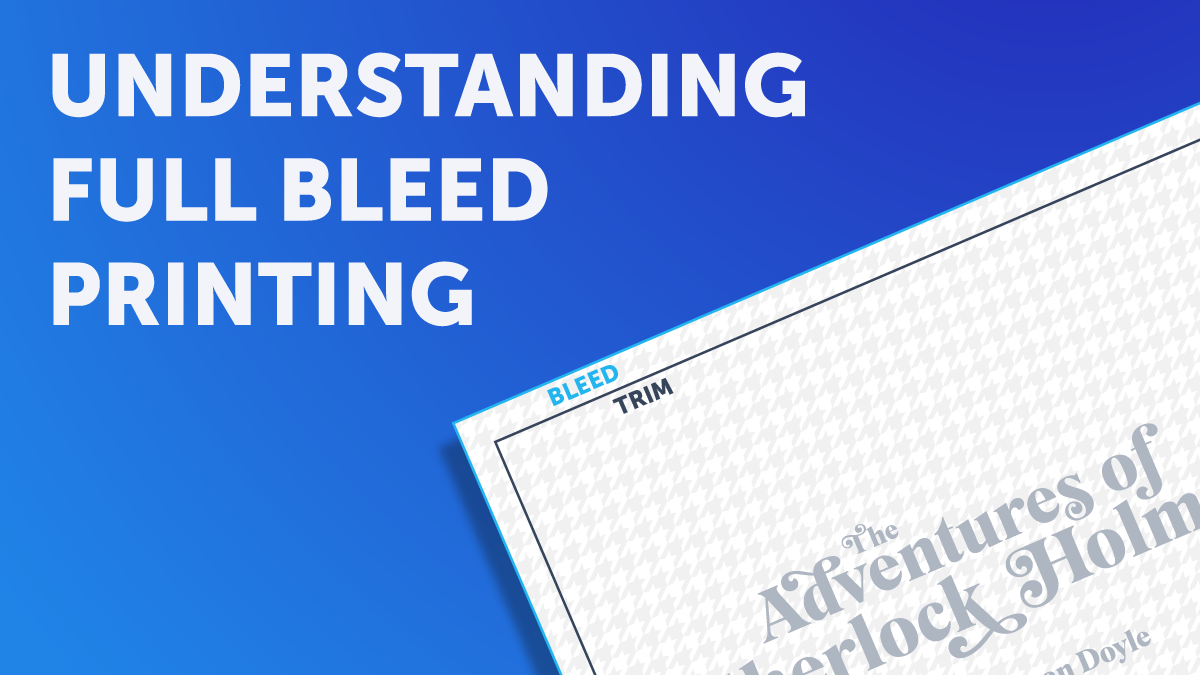
Adjusting Page Size
To change the size of your pages, select Layout from the ribbon. Word will present you with some common sizes, but to set up for full-bleed printing, you should select Custom Page Size and enter the dimensions for your pages. Remember, to print your book, you’ll need to increase the page size by 0.25 inches to allow for trimming.
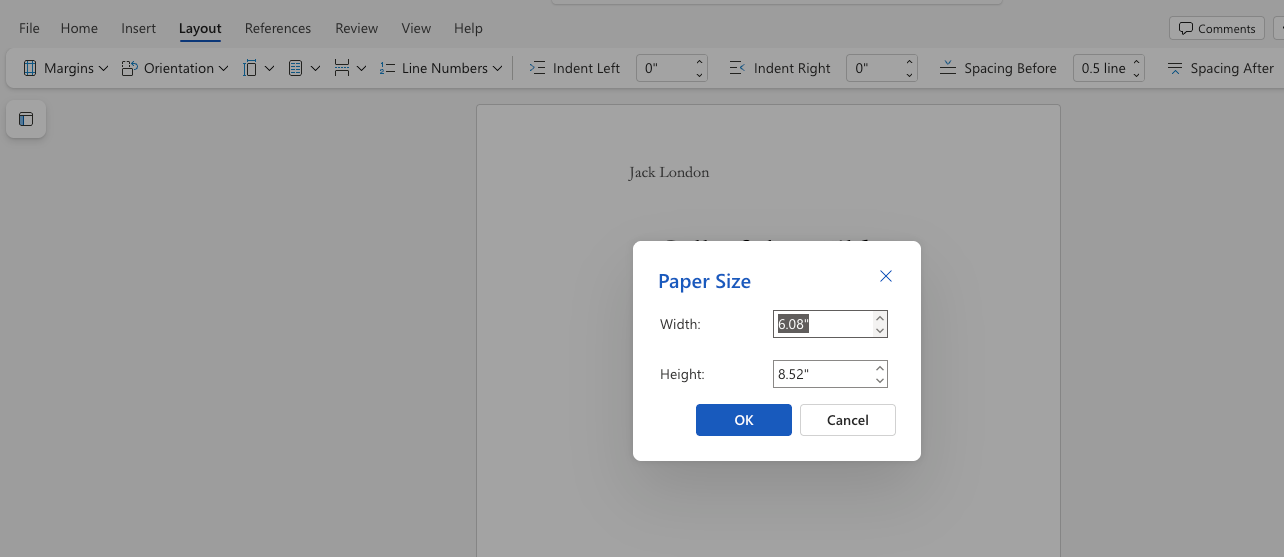
In this example, I’m creating an A5-sized book. The final size will be 5.83 x 8.27, but I’ve increased the page size in Word to include the bleed margin. Here’s another visual example of the page size, including margins and gutter.
Headers, Footers, and Page Numbers
This will be the biggest challenge for page layout in Word. You can insert a header and footer, each with two columns, to add content (like page numbering, your title, or your author name). But you won’t have much control over the layout or design.
You can’t use Section Breaks in Word online, which is the biggest problem for formatting headers and footers. Without sections, you can’t control where the page numbers start and end, so you won’t be able to remove them from your front matter.
The workaround would be to create a separate document for the front matter and merge the two PDFs outside of Word. It’s a pain, but the only way I’ve found to have page numbering isolated to a section of the book.
Creating a Print-Ready PDF in Microsoft Word
The final step in the process is to create your PDF for printing. It’s very simple. You’ll go to the ‘File’ menu and select Export > Download as a PDF. Then you’ll have an option to download it or email yourself a download link.
That’s it. That’s your PDF.
There’s not a lot you can do to control or manage the download, but here are the most important variables you can manage in Word online:
- Accept or reject Track Changes and Comments
- Make sure images are 300 ppi
- Use grayscale for black-and-white interiors or sRGB for full-color interiors
- Use the free fonts to ensure they are embedded
When You’ll Need the Desktop Version of Microsoft Word
There are numerous limitations to the free and online versions of Word. When you’re making a file for your print-on-demand book, the most noticeable ones are:
- Lack of section breaks
- No gutter control
- PDF export settings
Without section breaks, you won’t be able to control the content of your header or footer—it will be 100% all or nothing. The lack of specific gutter controls can be problematic for longer books. The gutter is a small, additional margin placed on the inner edges of the page. That means it will alternate from side to side for each right- and left-hand page. The gutter adds space to ensure all of the text is easily readable when the book is held open.
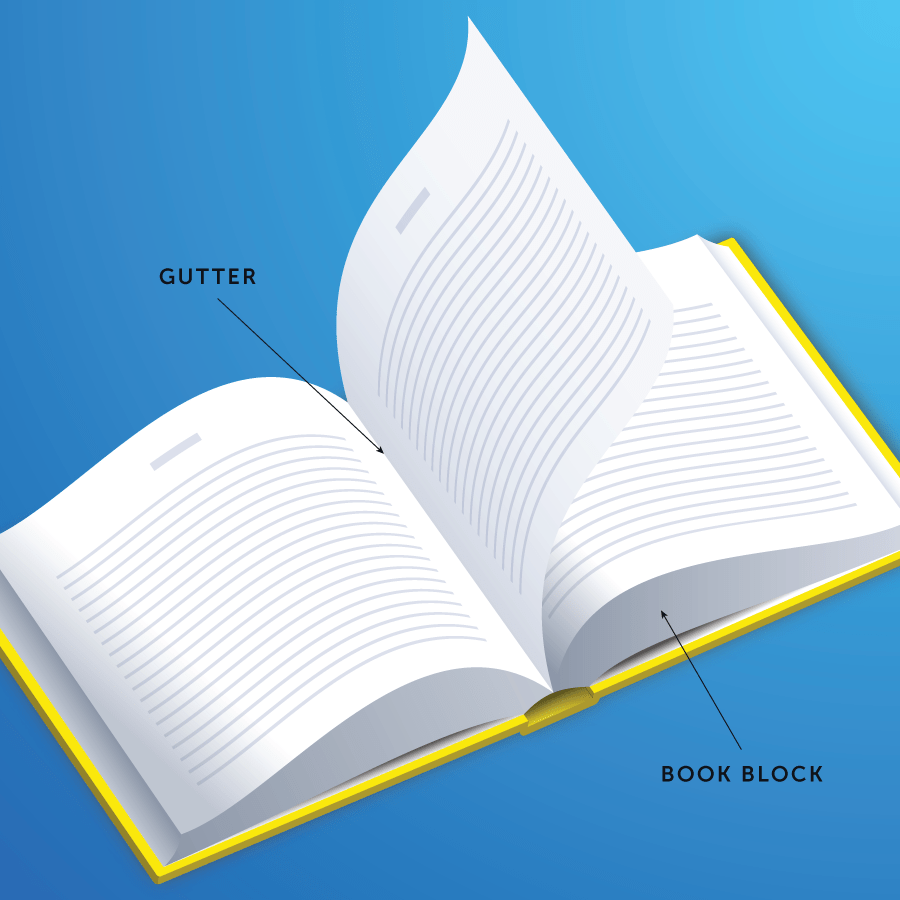
You’ll only have control over your overall margins.
The PDF settings are the biggest potential issue. Other limitations impact how you can style and design your pages, but without proper PDF settings, your file may not be accepted for printing. Font embedding, image PPI, and colors can all vary based on PDF export settings. With Word online, you won’t have access to any of those settings.
You just get what you get.
If you need to manage colors, are using color images, or you’ve got some non-standard fonts, you’re almost certainly going to need to use the desktop version of Word (or a true page layout software like InDesign or Affinity).
Watch our Tutorial for Export with Word (Desktop)
The Pros & Cons of Microsoft Word
Microsoft Word has always been a great word processor. For a long time, it also tried to act like a page layout tool. When the self-publishing boom hit in the 2000s, authors and individual creators who were comfortable with Word looked to it for their print files, too.
This was a bit of a misstep, as it’s never been Word’s specialty.
Today, with Word’s free online editor, it’s become even more apparent that Word is not meant for page layout.
So the pros and cons are really easy to define.
Pro: Word is an excellent, free web-based word processor. It’s on par or better than everything else in the market at that price point.
Con: Word is mediocre to terrible for page layout.
That’s really all there is to it. Microsoft has done a solid job upgrading its word processor, but if you want a professional-looking page layout, you’ll at least need the desktop version of Word and more than likely an advanced tool like InDesign.