How to Get Started Publishing
Some indeterminate amount of time ago (time is a wibbly-wobbly Jeremy Bearimy of a thing that no longer feels linear in any way), I shared a post called How to Get Started Writing. In case you missed it, the post was all about—shockingly enough—how to actually get motivated and get ready to sit down and start writing your brilliant idea into a book.
So let’s assume you did that. You did the hardest part—you sat down in front of a laptop or keyboard or notebook and you wrote a book. You WROTE A BOOK! Congratulations, I knew you could!
The question is…what do you do with it? To start, don’t panic. After that, keep reading this post!
I. Polish Your Book
No matter which publishing route you plan to take, traditional or self-publishing, it’s never a good idea to try to release a first draft manuscript into the world. But that doesn’t mean you have to hire an editor immediately to read every single draft you write. In fact, you shouldn’t hire an editor immediately – there’s plenty you can (and should) do on your own to whip your draft into shape before you pass it on to anyone else.
We’ve talked a lot about different types of editing over the last few months—in fact, we’ve even devoted a whole blog post just to outlining 7 Things to Do Before You Hire An Editor. If you want to take a deep dive into editing, I would definitely encourage you to check out that blog post and at least a few of the other ones I’ll link below. If you really want to deep dive into editing your book, you could also watch this webinar on Editing at Every Level. But if you’re looking for a more general overview of what to do next (with the added bonus of links to more informative articles!), then read on:
1. Self-Edit
This might be the hardest part of writing. Maybe I’m biased—I’m a terrible self-editor, I either panic and scrap the entire draft or get extremely defensive over every single one of my darlings. But while it can be difficult, it’s also both extremely necessary and extremely worth it.
Before you give your book to anyone else—a beta reader, a writing partner, a professional editor, anyone—you should read it through yourself at least once. As editor Sandra Wendel says on the Nonfiction Authors Association blog “I like to tell authors, ‘Don’t come to me until you are sick of looking at your manuscript. I want you to be completely done, not just tired of it. I want you to have written and rewritten more than you ever thought you would.’”
Editing is a different process for everyone, and only you will know what works best for you. If it helps, two of my favorite self-editing tips are:
- Print Your Draft – We recently shared a blog post on Creating An Editing Edition. Is this a shameless plug for Lulu? Maybe (really though, one of the coolest things about Lulu is that you can print one-off copies, we have no minimums and no start-up fees)! But honestly, I’ve been printing and hand-editing my work since I was thirteen, long before I worked here. It’s a great way to cut out the distractions and just focus on the print on the page. Try it! Print out just one chapter as a test, and see how it goes!
- Read Your Draft Out Loud – I know, that sounds crazy. Think of how long that would take, reading a whole book out loud! I get it. But it’s so helpful. Reading out loud forces you to say every word, which can be fantastic for catching typos, repetitive words, run-on and drawn-out sentences (guilty), and more. Go ahead, take that chapter you printed out, pick up your favorite brightly colored pen, and give reading out loud a try. Or hey, maybe you don’t want to do all the work of reading it out loud yourself…check out this blog post on Using Text-to-Speech Apps to Edit Your Book.
There’s also the option of running your manuscript through editing software. We’ve reviewed a few different programs that we’ve experimented with, including AutoCrit, Grammarly, and Hemingway Review. These can be great tools for any writer, as an impartial (if not slightly ruthless) editor. Even if you ultimately don’t agree with the critique generated, the suggestions can still help you with your editing process!
Last but certainly not least, do your best to take off your writer hat and try to actually read your book. Think of it like trying to see the forest for the trees—you’ve spent time and energy on the nitty-gritty of your manuscript, but how does it all work together? Does it make sense? Did you enjoy reading it? Were there any boring parts or glaring gaps of information? Maybe you can answer that yourself, maybe you can’t. If you can’t, it’s time to get another person involved.

Your Free Lulu Account
Create a Lulu Account today to print and publish your book for readers all around the world
2. Peer Edit With a Writing Partner or Beta Readers
In the How to Get Started Writing post, we talked about finding a buddy (or a writing group) to come along on this crazy terrifying exciting nerve-wracking journey with you. So, assuming you did find a writing partner… how would they feel about reading your draft now that it’s done?
No writing partner? No problem. What about a few trusted friends or family members, a willing co-worker or classmate, maybe even a slightly-removed acquaintance that just loves to read? We call those beta readers—like beta testers—and the right beta readers can offer invaluable feedback on things like your characters, plot, story flow (fiction), or information delivery and content organization (non-fiction).
Whether you’re exchanging drafts with a writing partner (and you should offer an exchange, besides being common courtesy it’s also a great way to learn the craft from a fellow writer) or finding a few beta readers, now is the time to get another set of eyes on your book.
Pro Tip: Establish before they even start reading what kind of response you’re hoping to get from them. Not how they’ll respond emotionally to your book—you want their honest opinion, after all—but what kind of feedback you want from them. Whenever any of my friends send me a draft to read I always ask them the same questions:
- Do you want in-line comments and feedback within the body of the text, or would you prefer a general, overall response once I’m done reading?
- Do you want copyediting (typos, grammar errors, etc.) or just content feedback?
- Do you have any specific questions or details you want me to pay attention to?
That way we make sure we’re on the same page about what kind of feedback they’re asking for and what they’re expecting from me, and we both know we’re using our time productively.
If you want to learn a little more about beta readers, check out that Editing At Every Level webinar—you can hear me ramble on about finding and working with beta readers and sensitivity readers at this timestamp.
3. Consider Your Professional Editing Options
One of the most amazing things about self-publishing is that it gives you, the writer, complete creative control over your project from start to finish in a way that traditional publishing absolutely does not. However, just because you have that complete creative control, doesn’t mean you should do it all alone. There are incredible resources out there to help you make your book as polished and professional as possible, and while it’s up to you how many of those resources you actually choose to use, we are huge advocates for hiring at least one professional editor.
Now, if your first response to that is “what do you mean at least one?” that’s understandable. A good editing team makes the process look so seamless that you might not notice that yeah, there’s a whole team of different kinds of editors working on just one book. There are developmental editors, copy editors, line editors, and probably even more. To take a closer look at those different types of editors, check out this blog post or watch the Lulu University video embedded above!
Ultimately, you probably don’t have to hire all three types of editors. Editors can be expensive, and we understand that you want to allocate your publishing budget wisely. So, to help narrow down which type of editors you may or may not need for your book, consider these questions:
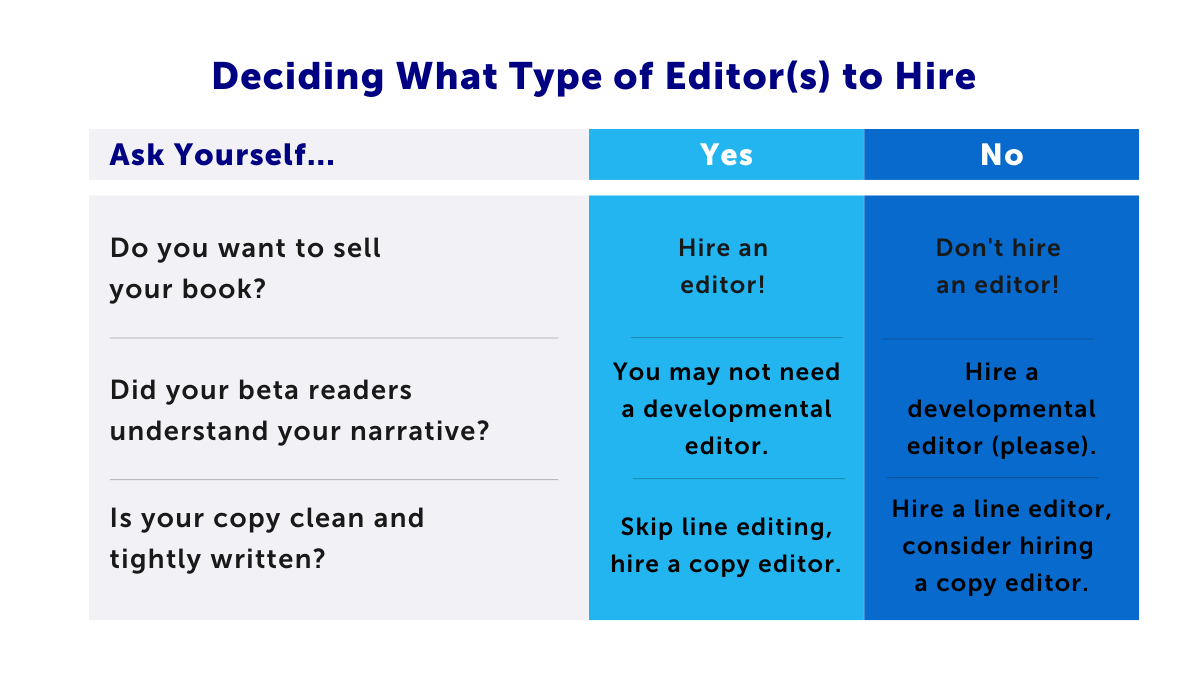
Have I sold you on hiring at least one editor yet? I’ll assume yes.
If you’re looking for an editor (or a few) and you’re not sure where to start, I recommend our Partners Page, where you’ll find professional editing teams like Technica Editorial, The Book Butchers, and 2nimble. I’d also recommend freelance marketplaces like Fiverr (check out this post on Building Your Publishing Team With Fiverr) and organizations like the Editorial Freelancers Association.
Plus, don’t forget about your own writing communities – ask for recommendations for freelance editors other writers in your genre may have worked with, or maybe even if any of them are professional editors on their own! In case you haven’t noticed, there tends to be a lot of overlap between publishing professionals and aspiring authors. We’re all just one big community like that.

At last, you’ve done everything you can do for your manuscript. It’s written, it’s edited, it’s polished, it’s perfect.
Up until now, the steps toward publishing would work for any author—self-published or traditionally published. Sure, maybe you wouldn’t spend as much money on an editor if you were going the traditional publishing path (although it never hurts to have a keen professional eye take a look at your manuscript before you start shopping it around to agents), but the general structure is largely the same. Until now.
Now it’s time to make a big decision because this is where the path truly splits—do you want to take the self-publishing route or the traditional publishing route?
I’m going to assume that, because you’re here, reading a blog post from a self-publishing company, you’re leaning toward self-publishing your book. Let’s take a look specifically at the next steps for self-publishing your book.
II. Format Your Book
In case you’re not sure “formatting,” in this case, refers to the interior layout of the book. Things like chapter headings, page numbers, paragraph layout, page breaks, footnotes/endnotes, any images or graphics, etc. It’s the process of taking your book interior from the picture on the left to the picture on the right:
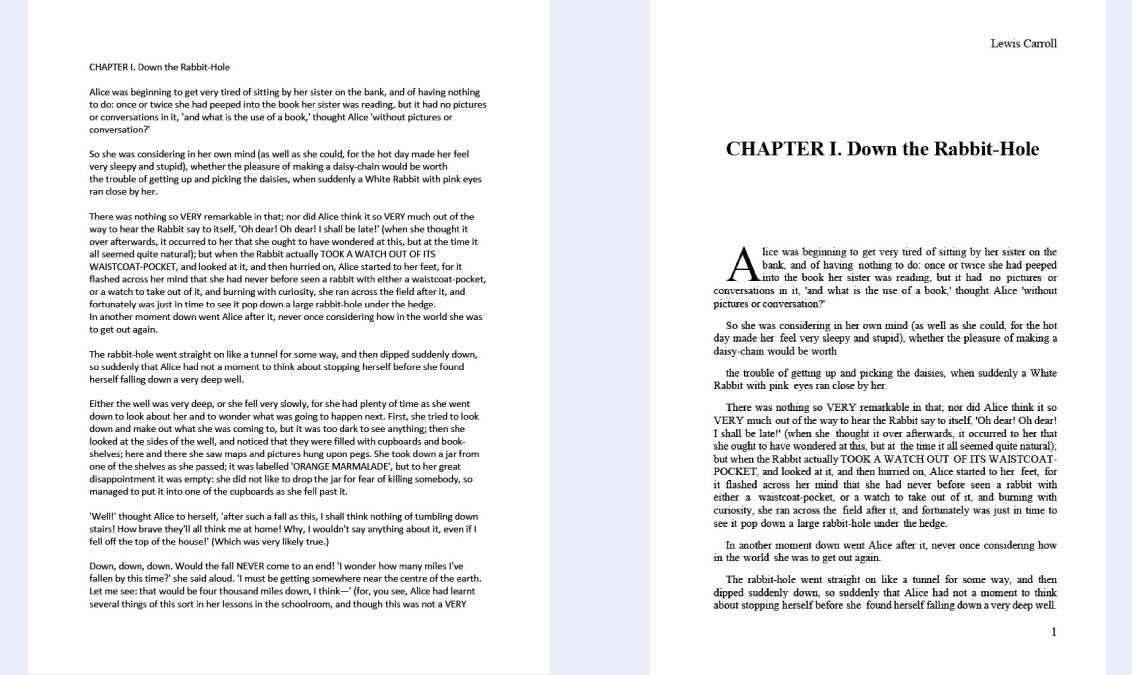
Of course, the question is how to get from the left to the right. Don’t worry, we have you covered.
First things first though, it’s really important that you don’t start formatting your book until you are completely done editing it.
Louder for the people in the back: don’t start formatting your book until you’re done editing it.
It takes one—one —errant period to restructure an entire page, and then you’ll have to start your formatting all over again. Seriously, it’s a pain, don’t do it.
Formatting Guides and Resources
We’ve worked hard to create an abundance of free formatting tools and resources. We know that formatting is complicated and confusing. And also that it’s one of the most important parts of creating your book. A well-formatted interior is a key part of making your book marketable, so I would definitely encourage you to check out some of our resources to help make your book look professional.
Our Free Publishing Resources page will direct you to an enormous library of different informational articles, guides, professional networks, and other great resources, including formatting tools. In particular, our Book Creation Guide includes all the specs to help you get your file set up right, and our Design Guide Bundles include template documents in all our most popular sizes.
Our Fun With Formatting webinar is a detailed tutorial that walks viewers step by step through formatting the interior of a novel in Microsoft Word (seriously, I have watched this webinar every time I’ve created a book for myself, it’s extremely helpful). And hey, while you’re over there on our YouTube channel, we also have a playlist of tutorial videos to guide you through setting up interior and cover files, as well as exporting your print-ready files.
“Print” Your Book
Once you have your file formatted exactly the way you want it, including all your front matter (title page, copyright page, table of contents, dedication, things like that) and your back matter (acknowledgments, index, author bio, etc.), the absolute last final step to finalize your book’s interior is to create a print-ready file.
This step is SO important because it guarantees that all the hard work you just put into formatting your book is preserved and translated correctly when your book goes to our printers. How devastating would it be to spend all that time making the pages look just right, only to receive your proof copy in the mail and realize the formatting got all messed up in the print process? You don’t want that, and we don’t want that for you. So, print-ready PDF files.
It’s okay if you don’t know how to create a print-ready PDF—I don’t either. That’s why we’ve created plenty of articles and resources on exactly how to do that. Here are just a few of them:
- How to Make a Print-Ready PDF (blog post)
- How Do I Embed Fonts in a PDF (Knowledge Base article)
- Exporting an Interior File with Microsoft Word (tutorial video)
You’ll find many more resources in the Print Book Formatting section of our Knowledge Base, so be sure to check that out too!
III. Create Your Cover
Blah blah blah don’t judge a book by its cover, right? Except, we all know that’s a big fat lie. Everyone judges a book by its cover. Everyone.
Your cover is the very first thing people will see about your book, it’ll likely be the deciding factor between someone “picking up” your book (maybe literally, in a brick-and-mortar bookstore, but most likely clicking on the link to read more about your book) or passing on it.
So like, totally not important, right?
You have some options when it comes to creating your cover, so let’s take a look at both paths in front of you – creating your own cover and hiring a professional cover designer.
Creating Your Own Cover
So you’ve decided to design your own cover.
For some of us, this is the fun part, so I’m right there with you! Whether you’re an advanced creative type designing your perfect cover in Adobe InDesign or a beginner with a can-do attitude, we have the resources to help you make your cover just right.
First things first, and maybe most importantly, don’t get started on your cover until you have the right design specs. You want to create your whole cover—front, back, and spine—as one big image. The dimensions of that image will change based on your book’s size and the number of pages in your interior file.
To calculate the exact specs for your specific book, you have a couple of options. Back to those Design Guide Bundles that we downloaded with formatting tips and templates – there are also instructions for calculating your cover specs. But if you’re like me and you’re not a fan of math, there’s an even better way to get your exact specs, with a downloadable PDF template that’s exactly the right size for your book.
If you upload your interior file to our publishing tool and scroll down to the “Design Your Cover” section, you’ll see a button to Download Template. That cover template will be sized to fit the interior file you uploaded, the spine, and all!
Earlier this year we rolled out a brand new cover design tool that’s built right into our publishing tool. This integration with Canva has been really exciting, so if you haven’t checked it out yet I’d definitely encourage you to do so! If you don’t want to get into the publishing tool yet that’s okay—we have a tutorial video showing off the step-by-step process. We also have a blog post that breaks down how to use Canva For Your Cover, if you’re more into reading than watching.
As for how to design your book cover? Well, we could talk about that all day. In fact, we have. Check out this Lulu U episode on How to Design a Book Cover, this webinar on Getting Smart With Your Cover Art, and this blog post on Book Spine And Cover Best Practices. Plus, keep an eye out for some more cover design resources we have coming out soon!
Pro tip: if you’re really not sure where to start, take a look at other books in your genre, particularly popular new releases. You’ll see pretty quickly what’s trending in terms of style design and “tone,” and probably get a good idea of what elements you’ll want to include in your own cover.
Hiring a Professional
Maybe creating your own cover isn’t for you. That’s completely understandable, it’s definitely not easy, and there’s a lot of pressure riding on your cover. Great news: there’s a great big world wide web of people who have the professional skills to design your perfect cover for you.
We have a few cover designers that we feature on our partner’s page, including MiblArt, Bailey Designs Books, and Ebook Launch. But I would also encourage you to check out freelance marketplace sites for cover designers—99designs and Fiverr are both great places to start. Wherever you find them, just make sure you find a designer who can help you bring that dream cover to life!
IV. Publish Your Book
This is it. The big one. The one we’ve all been waiting for. You wrote your book, polished it to perfection with editors and beta readers and writing friends, formatted the interior just right, and wrapped it up in a gorgeous cover from front to back.
You are ready 👏🏼 to 👏🏼 publish 👏🏼
Upload those interior and cover files, order yourself a proof copy, and get ready to hold your beautiful new book in your hands. And yeah yeah sure, there’s still plenty left to do with marketing and building your author network and actually, you know, selling your book. But there are a bunch of other blog posts about all of that. Right now we’re celebrating you and your new book. Congratulations! You did it!
(hey, shameless plug from your friendly neighborhood social media manager—if you really did do it, take a picture of your new book and share it on Instagram with #shareyourlulu. I LOVE seeing the amazing projects our authors create)

