Nonfiction Book Formatting for Microsoft Word
A lot of writing advice focuses on storytellers. Fiction writers with sprawling tales or romance writers with steamy scenes—tips and tricks tend to zero in on creative writers. The same goes for layout and design advice; it’s all tailored to fiction writers. This means nonfiction book formatting often gets overlooked or ignored entirely.
That’s a shame since many people read nonfiction books every day. Yes, there are a lot of books that land in the very broad ‘nonfiction’ category (manuals, textbooks, etc.). But if we exclude supplemental materials and think just about nonfiction books, we’re talking about one of the biggest categories in terms of sales and growth.
Formatting Nonfiction Books
Nonfiction book formatting utilizes a few unique layout rules and some features uncommon in fiction books. If you’re preparing to publish your own nonfiction book, it’s important to take the time to learn how to format a book to meet your reader’s expectations.
It’s not hard to find a book design template to assist in laying out your book. I’ve written numerous guides about laying out your book using word processors like Microsoft Word and more advanced page layout tools like InDesign. But there’s more to nonfiction books than just the margins and gutter.
Formatting nonfiction books requires attention to some details your average fiction author likely never thinks about. Like citations—fiction authors rarely use these but a nonfiction author might include dozens.
Before Book Design
Like any book formatting job, start by finalizing the content. Get your manuscript proofed and edited. Don’t worry about the formatting or layout, don’t insert headers or footers. Just get the words right.
With that done, take account of what your content will look like. Do you have a lot of graphics, charts, or tables? Will you use columns? Is it a workbook or a manual? A series of essays? Or a memoir?
If you’re working with columns or several graphics, you might want to consider a dedicated page layout tool. InDesign or Affinity Publisher are my top suggestions. The design and layout of your textbook or manual are vital—your text will be another piece of the design but not the emphasis.
But if you have a memoir, academic texts, journalism, or any of a variety of nonfiction books, Microsoft Word is probably the software you’ll be using. Which, as a strong advocate for layout software that is not Microsoft Word, it hurts me to say. But it’s true. For simple layouts, Word is surprisingly robust when it comes to nonfiction book needs.
Keep in mind that you’ll be turning your DOCX into PDF for printing. No matter what book layout software you end up using, their file formats are only important while editing. Once you’re ready to print,, you need a PDF format file. PDFs are the industry standard for print books and you’ll need to be careful when creating PDFs.
That means you need to be sure you’ve properly set the page size and met all other formatting requirements along with these special elements unique to your nonfiction book. Most importantly, begin by setting your final paper size before you engage in any formatting.
Microsoft Word and Nonfiction Books
Word offers a lot of useful features for both writers and bookmakers. Their cumbersome interface and exporting features often hamper the experience, but Word shines for nonfiction books. The best nonfiction books all keep to a uniform, simple design that emphasizes the work the author’s done.
But sometimes a nonfiction book has to include important details or elaborate on a tangent to provide useful context. That’s where unique pieces of text in the form of citations, footnotes, or endnotes can help streamline your book’s design.
Citations
A lot of academic and investigative nonfiction books will have to reference source material. That might range from court documents to another researcher’s findings. And too, the way you format citations may vary based on the style guide you’re using. MLA and APA are the two most commonly used:
- APA style uses (author, date) for in-text citations. Direct quotes also include the page number (author, date, page number). Sources cited in-line should be included in the reference list accompanying the main content.
- MLA style uses (author, page number) for in-text citations. If the author’s name appears in the text, you can omit it from the citation. Works cited should accompany the main content.
There’s a good chance your nonfiction book will need some kind of citation. Be sure to settle on your style guide and follow it carefully. Fortunately, Word features an option in the ribbon to quickly add a citation. Just locate the location of the citation and select Reference > Insert Citation.
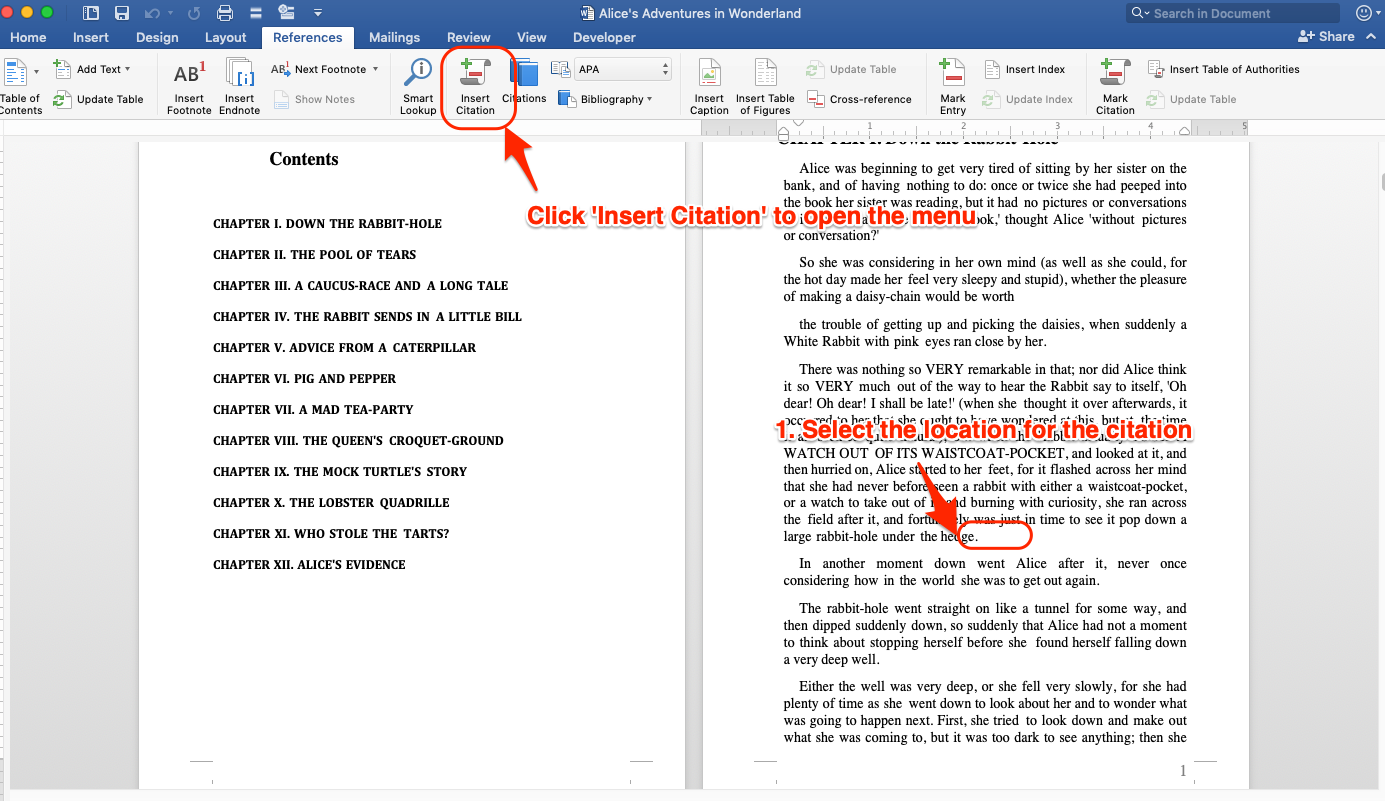
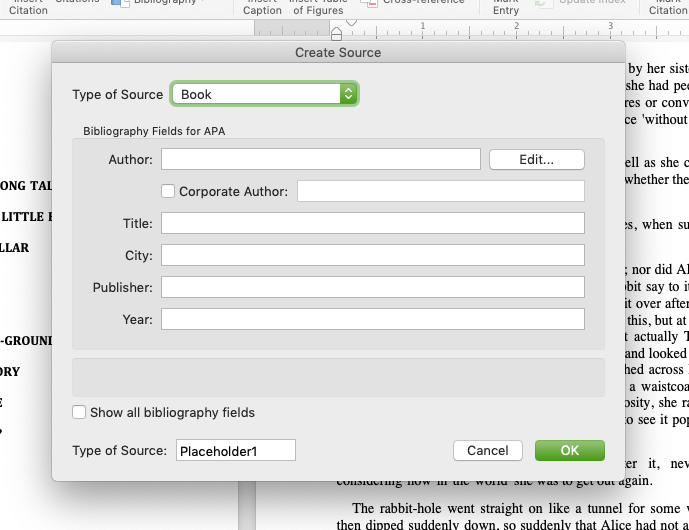
On this menu, enter all the pertinent information about your source. Word features a stripped-down (simple) citation menu by default. You can also check Show all bibliography fields to add more options and enrich your bibliography.
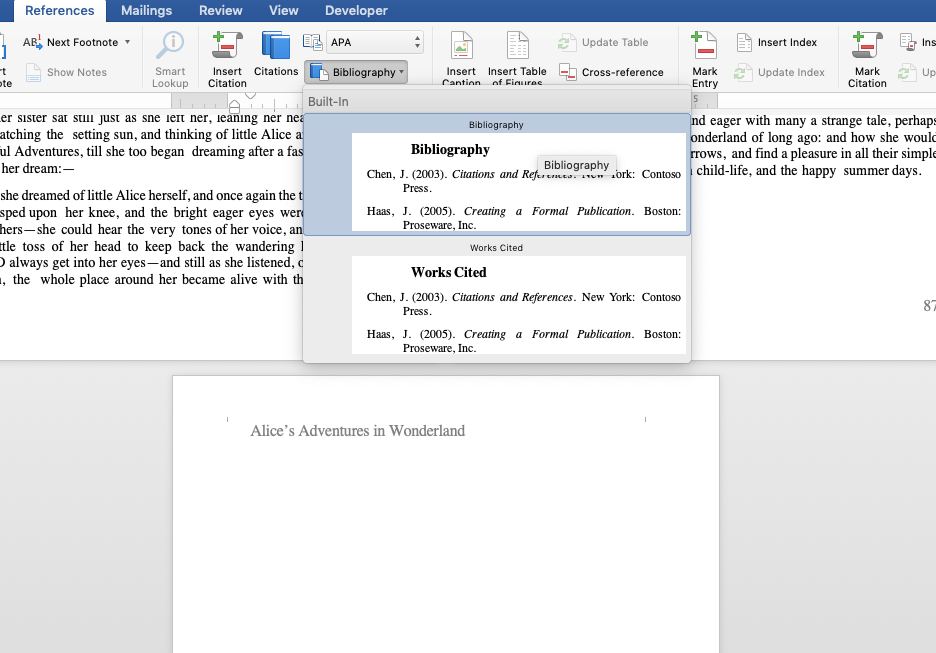
With your citations added, you’ll want to navigate to the back matter and insert a Bibliography. Select Reference > Bibliography to see Word’s pre-formatted bibliography options.
Word keeps it pretty simple with the formatting, but that’s actually a good thing. There’s no need for special formatting or design with your bibliography. Just keep it simple and accurate.
Footnotes & Endnotes
After citations, the most important (and unique) element of nonfiction you’ll use is the Footnote/Endnote. Traditionally used to expand on a tangential or extraneous point that doesn’t deserve space in the actual body copy, the Footnote requires specialized formatting.
Adding Footnotes and Endnotes is one of Word’s better features. In fact, it’s the only thing I can do in Word that I find easier and more intuitive than dedicated layout software like InDesign or Affinity Publisher. So, plus-one for Word here.
Inserting the note is simple. Just place your cursor in the document where the Endnote or Footnote will originate and go to Insert > Footnote.
The Location defines the placement of the note itself, either on the same page as the anchor text (Footnote) or at the end of the section/book (Endnote). Word’s ‘Convert’ option will allow you to switch between Footnotes and Endnotes.
The Layout control lets you add columns to your footnotes. This is very useful if you use Footnotes and have a single page with two longer notes. The two-column layout may use less space on the page to organize the notes.
Where Endnotes and Footnotes get complicated is in the logistics. When is it right to use one over the other? What’s an acceptable length for a Footnote? What about an Endnote?
Fortunately for you, the USC Library Guide has a great write-up detailing the pros and cons of Endnotes and Footnotes, as well as offering advice on when to use each. Here are the highlights:
Footnotes
- Pros
- Allows readers to quickly access notes and annotations with the content on the same page as the source material.
- No need to flip to or search out the note in the Endnotes section of the book.
- Cons
- The page can become cluttered by multiple or lengthy Footnotes
- Longer Footnotes may ‘take over’ the page copy, possibly distracting the reader.
- When using Columns, the Footnote must remain associated with a Column, leading to possible confusion or organizational issues.
Endnotes
- Pros
- Less distracting while reading.
- Maintains the narrative flow without interruption of supporting data.
- With a complete Endnotes section, the reader can view and consider all notes together after (or during) reading.
- Cons
- The notes are indirectly associated with the contents of your book.
- Organizing the Endnotes can be challenging, and readers will not be able to simply access the notes.
- The perception that something is being hidden (because the Endnotes are, ironically, at the end of the work).
Front & Back Matter
I’ve gone into some detail about what front/back matter is and why it’s important. Without rehashing the topic, there are a few special considerations for nonfiction books to think about. In fact, nonfiction books will use a lot more front and back matter than most fiction books.
Front matter is generally similar to a fiction book and should include your title and half-title page, the copyright page, a table of contents, and an introduction or preface to the work. For nonfiction books, the intro or preface may be very important and even quite long. Books that rely heavily on research or historical data will often begin with a word about the material used for source data. Popular nonfiction books and authors will solicit a letter from a well-known expert or outspoken celebrity to add gravitas to their book.
But it’s the back matter that is truly unique for nonfiction. Most fiction works will include one or two pages at the most, perhaps including acknowledgments and an About the Author page. Excerpts from a forthcoming book aren’t uncommon either, though I hesitate to actually include that kind of content as ‘back matter.’
Nonfiction books often have a lot more content for their back matter. A bibliography or endnotes section, index, related works, references, author bios, and more can all be included in your back matter.
In terms of how you’ll lay out your back matter, I strongly suggest creating a new section in your Word document. The easiest way to do that is to use Insert > Break > Section Break. Doing this is important because you will likely use different formatting for the back matter pages, like the works cited or endnotes. Creating sections in Word allows you to assign unique text styles to different parts of your document.
Columns
Most nonfiction will stick to just one column of text on the page. Two or even three-column layouts are for textbooks or manuals. But, if the content calls for it, you can use columns in Word. They can be found under the Format > Columns with a range of options for the number of columns and the spacing.
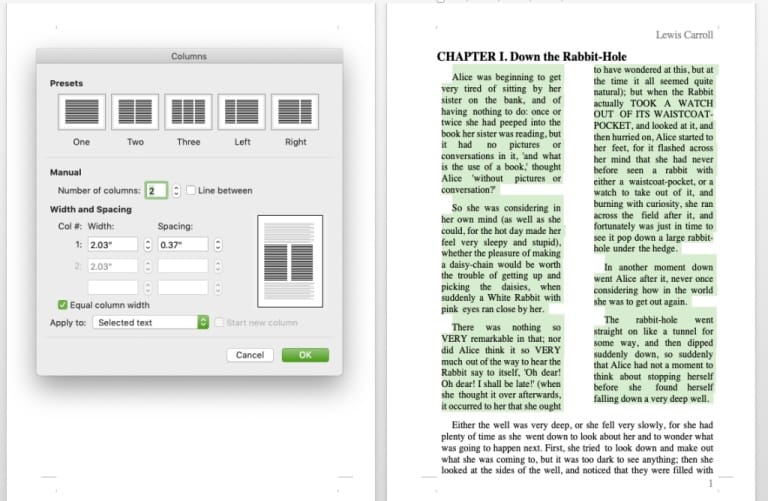
Once the columns are created, you can use the Columns window or the ruler to adjust the width and spacing. Notice that I’ve used an A5 page size for my example, resulting in two columns with a small amount of text (due to the page and font sizes).
Sadly, using columns in Word is no simpler than any other layout program. In fact, columns can be a major pain for Word users, as the layout shift and space between columns can cause the book’s page count to bloat. With fewer spaces for characters in each column, text justification gets tricky too, resulting in some weird line spacing.
I’ve only used a column layout sparingly, but I found the best way to manage them is to write and finalize the copy as a normal page, then apply the column settings to the sections as needed. This affords a lot of control over columns throughout the book, though it is important to remember that the application of columns will shift your contents.

Your Free Lulu Account
Create a Lulu Account today to print and publish your book for readers all around the world
Images
If you’ve ever inserted a picture into a Word document, you understand this meme:
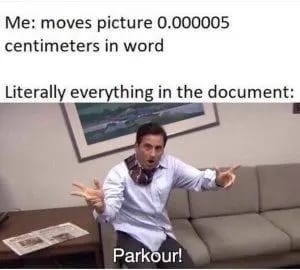
Images and Word are like oil and water. For nonfiction books, this can present some problems. If you’re using Footnotes or Endnotes and Columns, your troubles only compound as you’re forced to add multiple kinds of formatting to each page.
Managing images is far and away Word’s weakest point. From issues of placement and incorporation into the text to the way Word downsamples images and destroys clarity; Word is just not very good at handling images.
Adding the image is under Insert > Picture > Picture from File. This will insert the image at your cursor. Word will treat the image much like an oversized text character. The image occupies a line and follows the same rules as a piece of text. But for textbooks and the like, using Columns and other rich formatting, the image may result in some serious distortion or displacement.
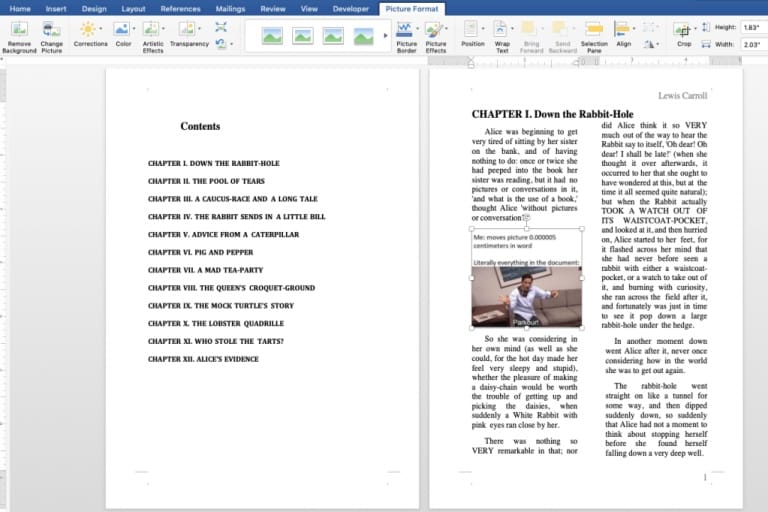
Unfortunately, aside from being careful when adding your images, there isn’t a great solution. Once the image is inline, you can reposition it and add styles.
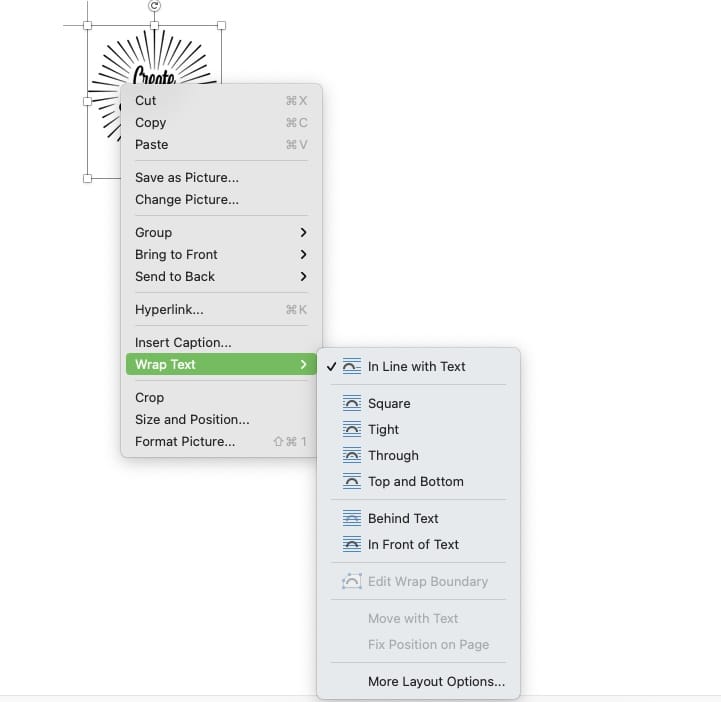
The alternative is to adjust the Wrapping for your image. To do that, right-click the image, select Wrap Text > and change how the image interacts with the text in your document. Using Behind Text and In Front Of Text will layer your image with your text—this could create an overlap in your print-ready PDF.
If you’re working with a Word document for your nonfiction book and you’re using images, I cannot stress enough how important it is to scrutinize your print-ready file before uploading it to your printer or publisher.
Other Considerations for Nonfiction Book Formatting
I hesitate to make a long list of formatting dos and don’ts or other arbitrary best practices for creating a nonfiction book. Simply because the range of what a ‘nonfiction book’ encompasses is…huge. From creative memoirs telling a story more akin to fiction, all the way to the other end of the spectrum with dry manuals and guides; nonfiction is a wide-open and varied genre.
For that reason, I kept today’s suggestions simple. The primary elements you’ll need to use with nonfiction that a fiction writer may not touch. Other best practices, like header/footer control and page numbering, don’t actually change much. You may be more inclined to include chapter titles in your header for nonfiction work, but the procedure to do is unchanged (and can be found here, along with info on inserting page numbering).
Like any book formatting venture, you should look to the standards and norms first. Don’t try to buck reader expectations until you have a firm and thorough understanding of how to meet those expectations. Thankfully, Word does a great job simplifying some of the more annoying nonfiction formatting requirements and makes them easy to insert.

