
11 Steps to a Professional Book Layout
If you’ve self-published a book, you know the many challenges involved. As if writing a book isn’t hard enough, you’ll also need to plan your marketing, determine how to sell the book and know how to lay out a book. Looking at a book off a bookstore shelf, it’s easy to miss the work and time that goes into the book layout. Let me tell you—it’s a lot of work. A lot.
Let’s review the best practice book page layout and page format.
How to Layout a Book
Your book has four essential parts: the front matter, content, back matter, and cover. The first three combine to make your print-ready PDF file, while the cover will be designed separately.
For this post, we will focus on the first three, but if you’re ready to work on your cover, get started by reading this article.
First things first, your book design turns your manuscript into a complete file for your book. Even though both are composed of your content—the story you must tell, a guide or manual, a textbook for the class you’re teaching—the manuscript is the raw content. You’ll need to carefully design your book file using book layout software to turn that manuscript into a print-ready file.
Best Book Layout Software
To reiterate, page layout design is not the same as word processing. You want to write and edit your book using a word processor, but once the words are there, you’ll switch to a design software for all the book layout.
You’ve got a ton of options for laying out your book file. You can use any program that can export a font-embedded PDF, but I strongly recommend using one of the tools I’ve (conveniently) reviewed in the past:


Parts of Your Book Layout
Let’s quickly review the parts of a book that you design for your book layout.
Content
This is the meat of your book. The story you tell, the manual or guide you wrote to share your expertise, the history you’re recounting, or whatever your book might be. Remember, the content includes text and images, as well as anything else, like tables or charts. All of that is content.
Front Matter
When you open a book, the first page is not the beginning of your story. No book opens directly to ‘Chapter 1’. You’ll see a half-title and full title, a copyright page, a table of contents, acknowledgments, an introduction, and any other information you need to provide a reader before they dive into the main content. All of this is collectively called Front Matter.
Back Matter
Just like the Front Matter, Back Matter is everything after the main content of your book. Usually, this includes the About the Author, any sort of index or bibliography, and often a few blank pages.
Learn more about Front and Back Matter.
Cover
Your cover is going to be an enormous piece of how you sell your book. For this post, we will not focus on the cover. But we’ve got some great content about creating a cover.
Solving the Book Layout Puzzle
I’ve written a great deal about laying out your book, and we even have an entire section of our knowledge base dedicated to these questions. While there are specific details you’ll need to focus on (I’ll get to those next), it’s important to acknowledge that every book layout is unique.
When you approach the problem of how to lay out a book, you need to first clearly define what kind of book you’ll be designing. That might be obvious when comparing a textbook to a graphic novel or a photo book to a fiction book. But even similar books, like a fictional story and a memoir, will have some unique elements—everything from fonts to endnotes to the use of graphics.
Once you have a sense of the book, creating a professional page design hinges on meeting reader expectations. Sometimes an uncommon design can work, but with anything, it’s best to start simple and only approach weird or genre-bending designs once you’ve mastered a basic book layout.
With that in mind, these 11 points are relevant when designing any kind of book. Some details will change, but if you don’t get each of these steps done right, you risk your book appearing unprofessional (and likely causing potential readers to pass it over).
11 Steps to a Professional Book Layout
#1 Finish the Book
If that first point made you roll your eyes, please stick with me here. It may seem obvious that the content needs to be done before you can start creating the book.
But that’s not always the way our brains (or creative processes) work. I have to restrain myself from tinkering with fonts, adding text formatting or page margins, and working on my page layout while I write.
There’s a very practical reason to finish all the writing, editing, and revising before laying out your book: each edit will change the character count in your file, potentially shifting formatting. Those shifts can affect page layout, numbering, and more.
So the key takeaway here is: Don’t tinker with layout or formatting while you write and edit.

#2 Create Front & Back Matter
Pick a book off your shelf and look at the first few pages. You’ll see a title page, copyright, maybe a table of contents, or some critic’s reviews of the book. That’s your Front Matter.
Now take that same book and go to the end.
You’ll probably see some acknowledgments, an about the author page, and maybe some advertising for the next book from that author. That’s your Back Matter.
The front and back matter bookend your book.
Your front and back matter need to be part of your content. I suggest creating a new version of your finished manuscript and labeling it ‘print’ in the filename. That’s the file you should add the front and back matter to.
Be aware of blank pages in your front matter. Most books will have a blank page or two, particularly in the front matter. We usually do this to set up the spread layout for the rest of the book.
#3 Research Genre & Style
You’ve written a sprawling historical romance. There’s passion and drama and deception.
Then you publish it with a cover depicting two robots attempting to salsa dance. Despite your Danielle-Steele-level romance writing, the book doesn’t sell.
When you’re writing and publishing, there’s a fine line between being original and meeting expectations. You need a book that visually and physically meets the reader’s expectations of your genre, while the contents are unique and engaging.
Fortunately, this exercise is relatively easy.
First, make a list of five books you’ve read that are thematically similar to your book. Then search those books and look at the genres they’re in across a few online bookstores. Write those genres down and look for repeats among the five titles.
Somewhere in there is your genre.
Last step; search your genre and look at best practices for layout, font, and cover design. You’ll want to hold to those standards to create a book that looks like your genre to readers.
#4 Create a Style Guide
I love guides and templates. It’s an easy way to ensure long-term consistency. For your books, that’s akin to branding. You don’t see brands like Nike or McDonald’s flippantly changing their logos or fonts, do you?
A style guide for your book is helpful for your formatting and doubly useful if you hire a designer for the interior or cover. Here’s a basic style guide template I like to use:
Fonts
- Heading 1 (Title) – Style / Weight / Size
- Heading 2 (Chapters) – Style / Weight / Size
- Body – Style / Weight / Size
- Header/Footer – Style / Weight / Size
- Title/cover #1 – Style / Weight / Size
- Title/cover #2 – Style / Weight / Size
Page
- Size –
- Trim size –
- Margins –
Colors
- Primary color – #hexcode
- Secondary color – #hexcode
- Black/text – #hexcode
- Title/cover – #hexcode
Your guide can be as simple or as detailed as you’d like. Once your style guide is ready, you’ll have a document on hand to reference as you lay out your book.
#5 Set Up Your Pages (Master Pages)
Open up your preferred layout software. Create a new, blank file or open a template from Lulu. If you wrote your book in Word and use Word for the layout, you should still open a new document to begin the page layout.
You’ll need to know your page size (informed by your genre research, naturally). I recommend downloading the appropriate template bundle and using our single-page template to start your project.
Open up the page and verify the dimensions. Yes, even if you use a template, you should still check the page setup specs to be certain everything is right. You’ll have some preset margins too; you may need to adjust those based on your book design.
If you’re in Affinity or InDesign, you’ll want to prepare Master Pages. I usually have a Master for the front/back matter and another Master for the body. That makes it easy to apply a running header/footer (with title/chapter/author and page numbering) to just the body of your book.
#6 Add Your Content
I like to add my content in sections. First the front matter, then I add the body text a chapter or section at a time. As I add content, I do minor fixes and set up my page breaks. That’s about it, though.
If you’re using Affinity or InDesign, you’ll want to check that none of your text boxes are overflowing. With a Master for the body pages set to include page numbering, check on that too. Your software and templates will get almost everything right, but you should still double-check to be sure. Now is a good time to look critically at the white space, line height, indentations, and other book layout factors that will affect your reader’s experience.
It’s very important to note that you do not want to fuss with page numbers if you are using MS Word. Not yet, at least. Save them for last, right before you export the PDF.

Your Free Lulu Account
Create a Lulu Account today to print and publish your book for readers all around the world
#7 Page vs. Spread Setup
This can be tricky. For most of us, it’s easier to layout a book in Spreads, but print-on-demand printers want files in Pages.
Here’s an example:
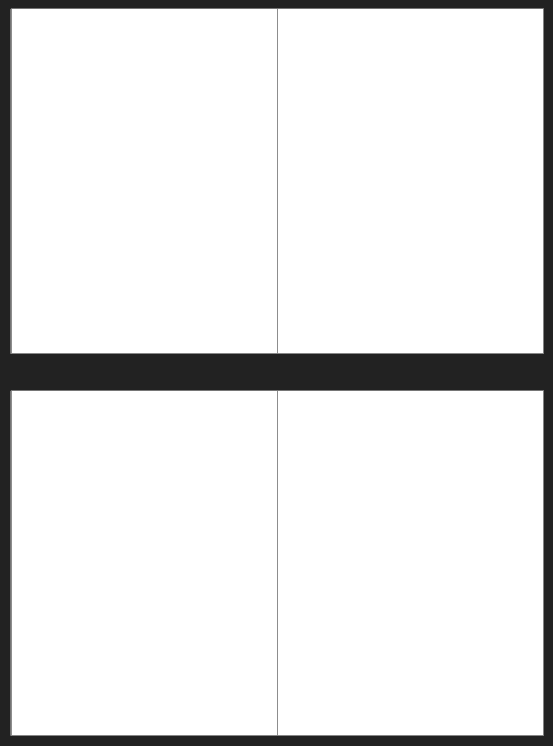

Spreads (right) compared to single page view (left)
When you’re viewing a file as spreads, your software pairs the pages just like they would be when you’re holding a book open. It’s incredibly helpful to see the book the way a reader will see it when you’re doing the layout and design.
But once it’s time to print, you need those individual pages. You could work in pages, but that creates the risk of misaligning your final PDF pages. InDesign and Affinity Publisher will give you options when exporting your PDF—either individual pages or spreads. Always be sure to select ‘pages’ so your print-ready PDF can be printed.
InDesign and Affinity make it easy to choose ‘pages’ when exporting to give you a spread view of the book while designing and a PDF of individual pages.
#8 Respect the First Page
Here’s that Spreads image again with a couple of notes:

This is important: The first page of printed books is always on the right. And because that right-side page is opposite the inside of the cover, there’s no left-side spread.
Tedious, I know.
The solution, when viewing your book layout as a spread, is to isolate the first page as you see it in the image above.
If you’re doing your layout in Word, you won’t have any options to view your book with this ‘book view’ layout. I don’t know why.
You’ll need to be very careful and conscious of page placement if you’re doing the layout with Word. Other tools, like InDesign, will isolate the first page from other spreads automatically.
#9 Apply Styles
You’ve got a book file that is nearly ready for exporting. The last major hurdle is to apply all your styles (from the style guide we covered earlier).
When I add my content, I like to clear all the formatting first. Since I do most of my writing in Google Docs, I simply select all, go to Format > Clear All Formatting, and you’ve got a clean, unformatted text. Word and other word processors will have similar features.
Now you need to create (or update) the styles in your layout software. Refer to your style guide. After that, I like to break my content into text blocks to apply the styles. Here’s an example:

After the Heading 2 / Heading 3 text, the rest of the chapter uses the Body style.
#10 Export Your PDF
Export that PDF! Check all your specifications to be sure layers are being flattened and fonts are embedded. You’ll also want to look for image compression to be sure any pictures or graphics are rendered properly.
Fortunately, we’ve got three exceptional tutorials on our YouTube channel to help you export your PDF for printing.
Once you’ve got your PDF, you’re ready to print!
#11 Print and Review
Note that I said ‘print’ and not ‘publish.’ Go to your Lulu account and create a new book project for printing. Don’t publish it, don’t put it in distribution, and don’t assign an ISBN. Just upload your files and order one copy.
This is one thing too many independent authors skip. I can’t fathom working for months or even years to write and edit a book, only to forgo actually reviewing the final product before you start selling.
You will find something that needs editing. A stray misspelling. An orphaned line at the bottom of page 39 throws off the balance of the page. That first printing is NOT your finished book. It’s the test to get those last improvements and corrections in.
Go through that first printing carefully and edit your file.
If time allows, do all this again for the second printing. With a little luck and thorough editing, that second run copy will be your finished product. It should be very near to perfect.
And if it’s not? Just revise again!
The Advantages of Print-on-Demand
Turning a manuscript into a book is an art. The most well-designed books are rarely flashy, though. It’s a bit of a hidden art; when the book design is working, you won’t notice it.
One of the biggest benefits of print-on-demand is the option to order a single copy. You can get a proof copy in hand quickly, make changes as needed, and even update the book later to match new marketing efforts. That could mean designing a new cover, creating a hardcover edition, or just cleaning up formatting as you learn more. Use that to your advantage as you learn the ins and outs of book layout.
Now you’ve got a solid plan for laying out your book and plenty of resources to help you design like a pro!

