6 Steps to Create and Print a Book for Beginners
You know that feeling when you finish writing a story? It’s something incredible. That last line, final punctuation. The end.
Of course, finishing the manuscript is just the beginning for most authors and creators. You’ve got the words on the page, but now you need to figure out how to turn them into a book to sell and share with your readers.
Self-publishing is easier than ever, but turning your manuscript into a finished product can still feel overwhelming. I’ve said this before—just writing a great book isn’t enough. You have to present your book to readers. Think about how the perfect frame emphasizes a work of art; your book’s design is like a frame.
Whether you’re working on your first book or adding another to your indie catalog, this guide will walk you through everything you need to design your book:
- Completing your manuscript
- Using dedicated design software
- Adding your book’s metadata
- Laying out your book’s pages
- Creating a book cover
- Creating and publishing your book
What Is Book Formatting?
Book formatting means turning your manuscript into a print-ready file. It’s more than just making sure your words fit on the page. It’s about creating a professional, reader-friendly layout.
Luckily, that’s why we’re here.
A well-formatted book keeps your readers engaged. It sets the tone and style from the moment they open to the first page. Getting it right is critical, especially if you want your book to stand out.
Publishing is deceptively easy—all you really need is a PDF file and some information. But designing that PDF file (the file that will include ALL the contents of your book) is where the biggest challenge often lies.
Today, I’m bringing together resources to get you started printing and publishing your first book. If you’re new to publishing or you just want to create a book as a gift, this is exactly what you need!
Step 1 – Completing Your Manuscript
I am notorious for wanting to format before I finish writing. I’ll spend hours deciding on a drop cap font or getting just the right line break graphic. I’ve wasted entire writing sessions just picking a font to use for the first draft.
Which is all to say; the first step is to finish your book. If you’re writing a novel, memoir, or another text-based book, you’ve got to get it all written and edited before you do any formatting.
Don’t be like me. It’s a trap. Don’t do it.Complete your manuscript first. Get the editing done. Polish every word. Consider hiring a professional editor to improve your work. Trust me—this step is crucial if you want a polished, high-quality book.
If you’re making a book with a lot of graphic elements—like a photo book, cookbook, children’s book, or journal—you’ll still need text! A lot of your story design will be in the page layout. You might want to storyboard your idea so you can think about where the text will go; however you do it, you’ll want to write all the words for your book before you start creating.
Step 2 – Choosing Your Book Creation Software
The software you use matters. It can make or break your formatting process.
I’ve used a lot of different programs to lay out book pages. On the whole, they all seek to do the same things:
- Give you control over the page design
- Let you standardize content design
- Make it easy to add content
- Create a PDF file for you
Select the software that fits your skill level and budget. Just remember, you’ll need to export your final file as a PDF for printing. Here’s a rundown of my top picks:
- Affinity Publisher: Affordable and powerful.
- Adobe InDesign: Industry-standard but pricey.
- Scribus: Free, but has a learning curve.
- Microsoft Word: Easy but limited.
- Atticus: Fast and easy to use.
Some, like InDesign and Affinity Publisher, are powerhouse design tools with a steep learning curve but endless options for preparing your files. Others, like Atticus, are simpler tools with fewer options but are focused on designing a PDF for publishing.
All of the software you’ll use to create a book has a learning curve.
Affinity Publisher
Built by Serif, the Affinity design software line is an affordable alternative to Adobe’s suite of tools.
Right now, Affinity Publisher is my go-to for page design. It offers most of the features Adobe InDesign does, at a fraction of the cost. The Serif team keeps it updated regularly too, so there’s no concern about learning a tool that won’t be around for a while.
What I like best about Publisher is the simple approach to page design. They offer the same power to create as other tools, but with tools and options that are easier to find and understand how to use.
Adobe InDesign
Are you a graphic designer? Will you be creating a lot of books? Do you have a small pile of cash you don’t want anymore?
If you answered ‘yes’ to any of these, Adobe InDesign is for you. Adobe’s page layout tool is, hands down, the most advanced and robust tool for designing. If you intend to learn the intricacies of page design, InDesign is the tool you need to learn.
But if you intend to design one or even a few books, you don’t need InDesign. Other software like Affinity Publisher or Scribus can match most features.
Scribus
The only free option I’m going to present today is Scribus, an open-source desktop publisher. You’ll get the same basic features as Affinity Publisher and Adobe InDesign but with a much clunkier interface.
In fact, most of what you pay for is the interface; Scribus certainly provides the same tools and options. Only many of the features are complicated to use or require really deep knowledge of Scribus to adjust your contents to fit your needs.
That said, you absolutely can use Scribus to lay out your book. If your design is really simple or you’re just a hardcore DIY’er, consider giving Scribus a try.
Microsoft Word
If you can avoid it, don’t use Microsoft Word to lay out your book. When it comes to writing and editing text, Word is just fine. But that’s where utility ends.
I’ve included Word in this list simply because it’s so prevalent. If you’re reading this and thinking “I use Word, I don’t want to buy and learn a new software” I sympathize. So rest easy, because you absolutely can make a book using Word.
Many of the formatting needs like headers and page numbering are overcomplicated in Word. So you’ll need to be extra careful when using Word to create your book files. You also need to note that Word is the only tool I’ve mentioned here that is not at all suited to cover design.
Atticus
One of the newest tools available for writers and creators, Atticus is a web-based text editor and page layout tool wrapped into one. You can write, edit, and revise using a Google Docs-like interface.
Then, once you’re ready to publish, Atticus allows you to export a PDF (or EPUB for ebooks) sized to match your book size and ready to publish. They include a variety of templates to make creating your file incredibly easy.
And you’ll have complete control over the settings, letting you create custom designs and even saving those to use for your next book.

Step 3 – Don’t Forget the Front and Back Matter
You’re almost ready to take your manuscript and turn it into a book. But first, you need to create and add pages for your front and back matter. These are the pages like the book title, copyright, and table of contents in the front and author bio pages in the back. I concede that you could design the front matter after you build your book’s pages.
You’ll want to add your front and back matter before doing the page layout so you have an accurate sense of your total page count. With your front matter, content, and back matter, you’ll eventually need to create a single PDF to upload, so it’s best to get all of that content together before you start designing.
If you’re making a book as a gift or if you don’t intend to publish and want to skip that content, I still encourage you to add a title page and a copyright page. Both are simple and take only minutes to add.
ISBNs, Copyright, and Distribution Channels
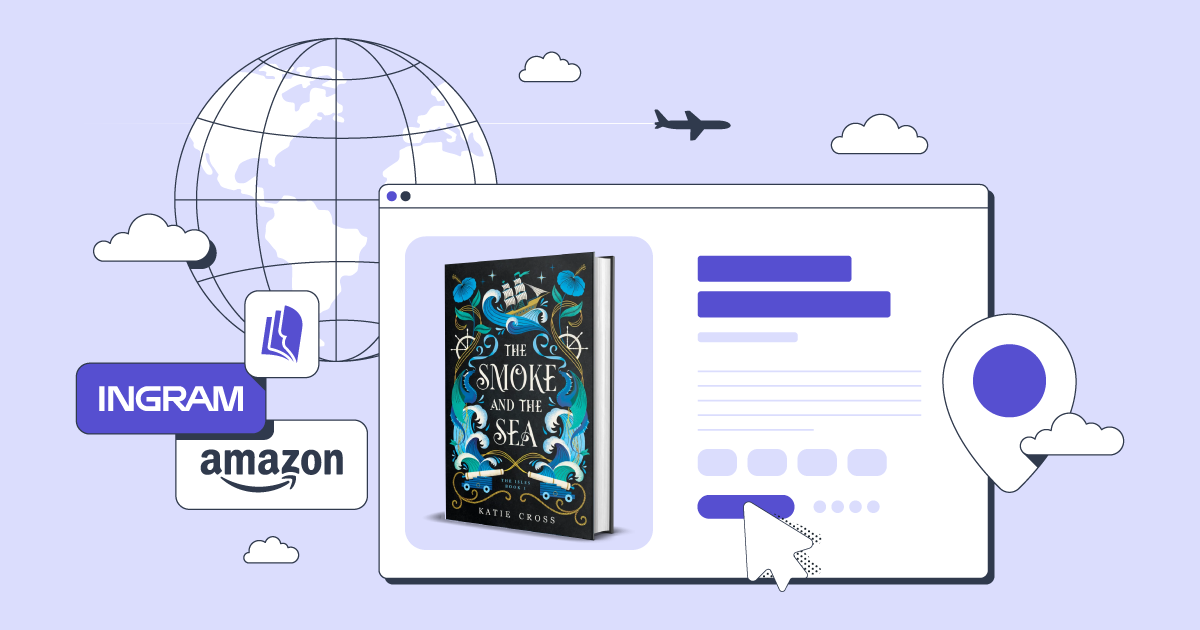
Want to sell your book online? You’ll need an ISBN. This unique identifier helps retailers and distribution channels list your book. You can use a free Lulu ISBN or buy an ISBN from your local agency.
Getting an ISBN might seem like an extra step, but it’s crucial if you want to sell through retailers. For Lulu’s retail distribution, you must include an ISBN.

Create Your Book
Use Lulu's free templates to easily create and publish your book today.
Step 4 – Page Layout Basics
Page layout is where you start to transform your manuscript into a book. It’s more than choosing a font. It means setting up your page size, margins, headers, footers, and trim size.
Decide your book’s size early. Novels often use 5” x 8” or 6” x 9” sizes, but you have options. Be sure to set your margins correctly to avoid any issues when printing. And don’t forget the gutter—the space where the pages meet. It’s crucial for a clean, professional print.
Here’s what a typical page might look like for a novel:

If you held the book open, that’s what you’d see. Now here’s that same spread with notes about some of the page layout elements:
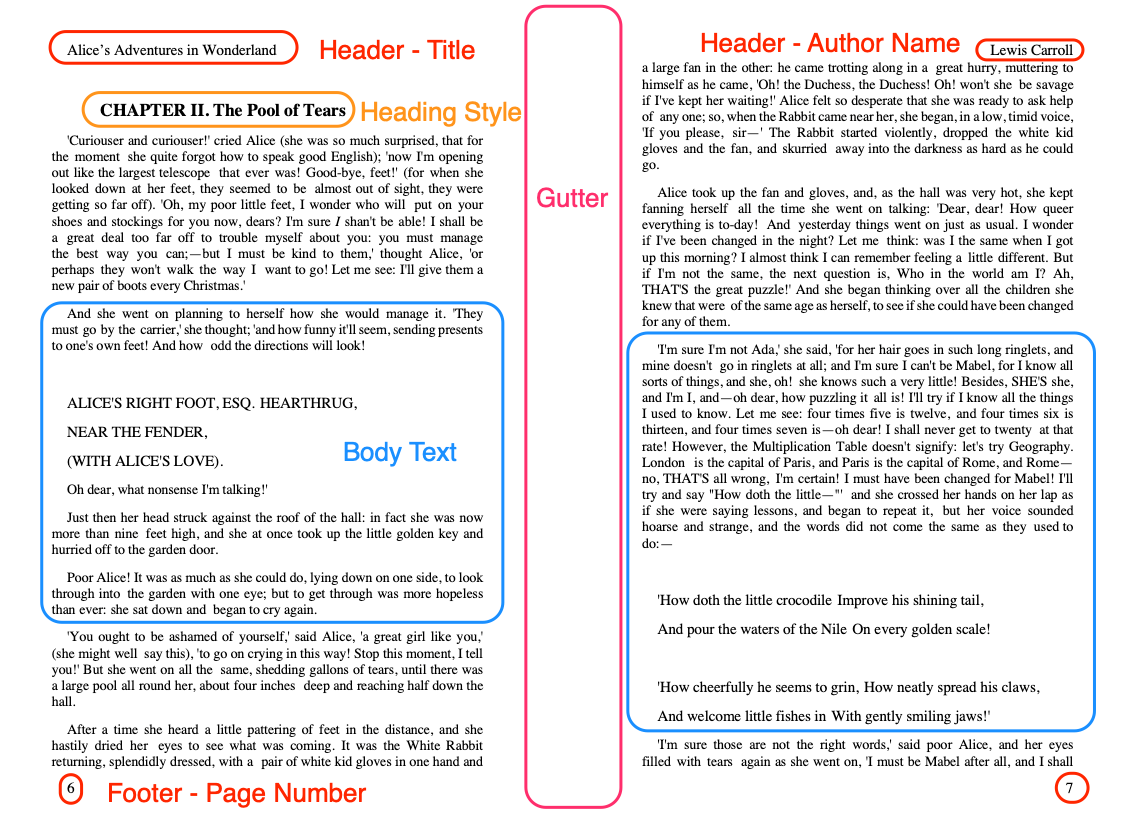
Understanding how to format a book has a few pieces of important vocabulary:
Page Layout Vocabulary
- Header – The Header is a space at the top of the page, between the main content and the upper edge of the page. You’ll often see page numbering, the author’s name, and the book or chapter title in the Header.
- Footer – Just like the Header, only at the bottom of the page. The Footer is most often where you’ll put your page numbering.
- Styles: Heading – The Heading text is used for chapter or section titles. This text is often typeset with stylized or genre-specific fonts.
- Styles: Body – The Body style is the basic design for your book’s text.
- Margin – The gap between your book’s contents and the edge of the page is called a Margin. It’s important to stay within the Margins to create consistent printing with no cutoff text or images.
- Gutter – The Gutter is an extra margin added to the point where the left-side and right-side pages meet. Giving a little more space here ensures none of your text or images are lost in the fold when the book is held open.
Okay, just some definitions probably aren’t enough to really help you get started laying out your pages. To simplify page design, I like to think about it in two phases:
- Page Design
- Content Design
Page Design
This is the layout of your page, including the space your text/images will occupy, the header/footer, margins, gutter, and bleed marks. Here’s an example of what a page might look like with all the page design elements marked:
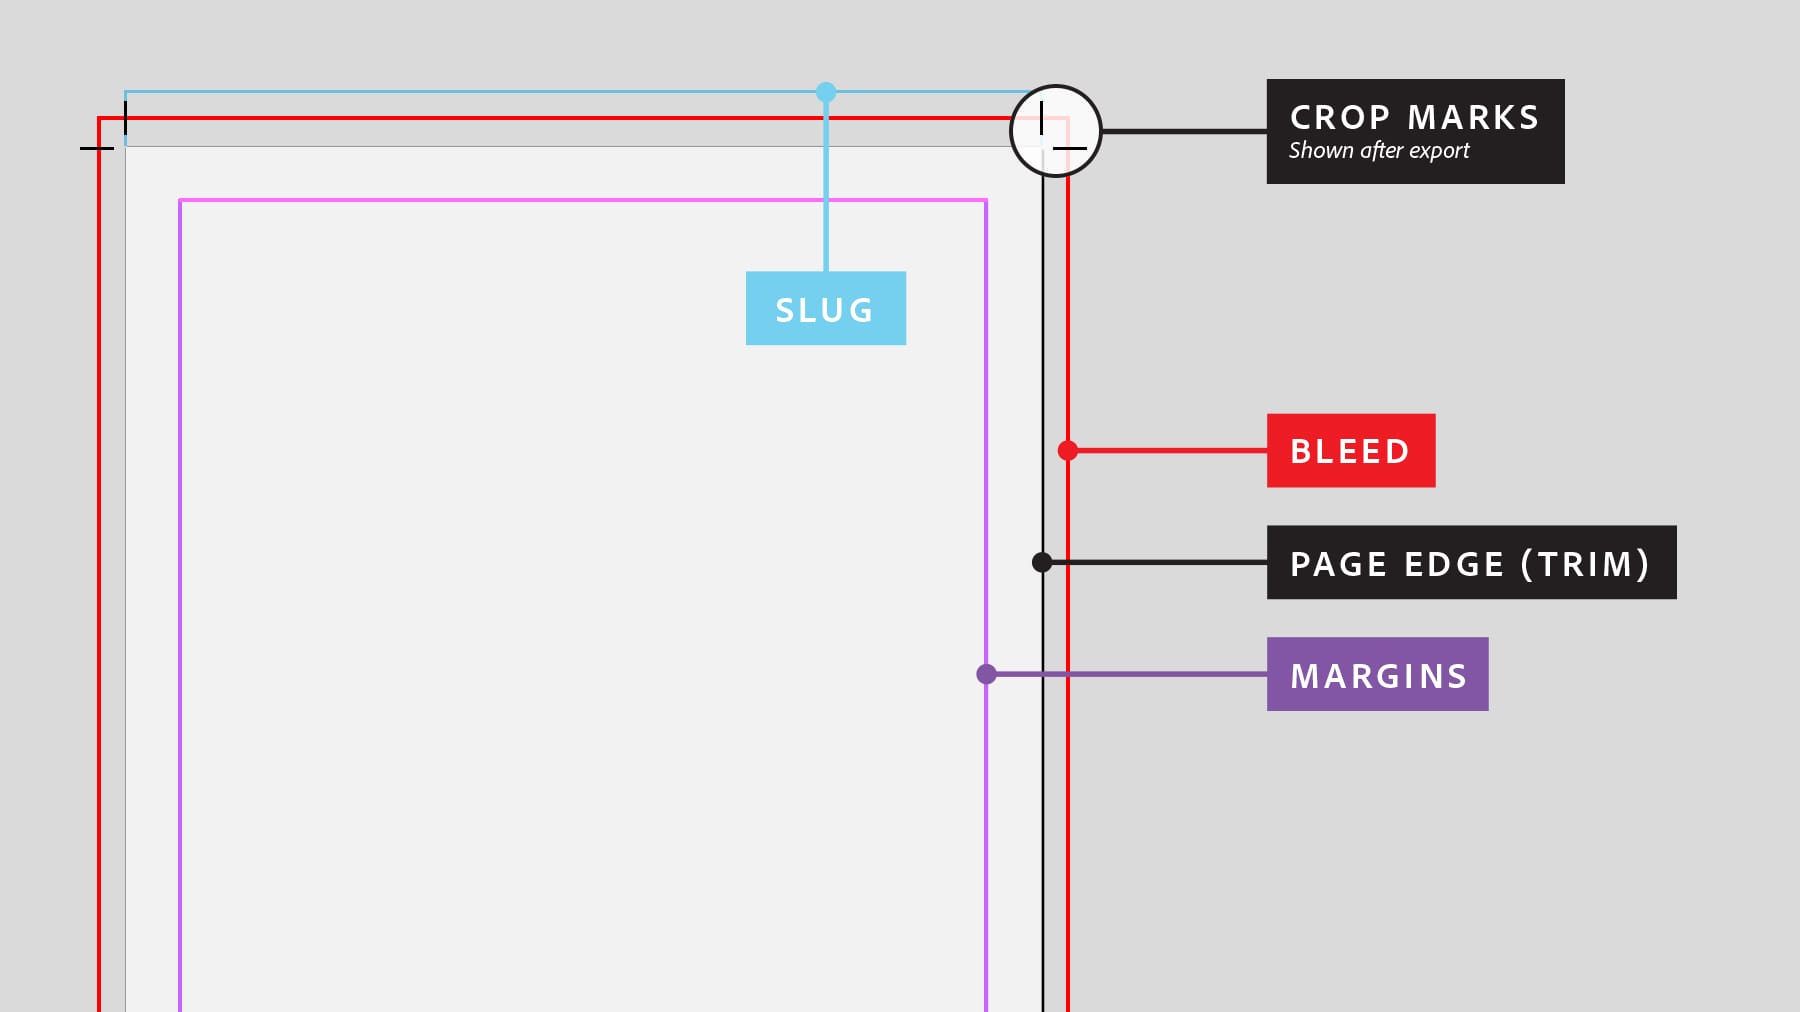
Note that this single page does NOT have a Gutter added. When you view your pages as spreads (two pages side-by-side), you want to verify the Gutter is present.
You’re also in luck—you don’t need to create your own book design! Self-publishers will provide templates that show the standard margins and bleed (at least) for their printers. You can get Lulu’s templates (including guides on how to use them) on our Products page. Find the page size you need and get your templates in no time!
The most important thing to remember is to avoid manual formatting. Basically, if you want space between some text, you could 1) mash the ‘return’ button or 2) adjust the spacing between lines. Avoid #1 at all costs.
You should include page breaks, line breaks, and any other formatting in the way your design software suggests. Avoid ‘cheating’ or anything that just looks good on the screen. You’re not writing a book to be read on a screen, in a page layout program. What you are doing is creating a file to print—keep that in mind as you prepare your file.
Content Design
Okay, now it’s time to geek out about fonts! Really though, you’ll need to think about the different kinds of text you’ll use. Chapter or section titles will want to stand out from the rest of the text.
When you’re making your book file, you’ll want to create some text styles. If you’re not familiar with using styles, they’re simply some preset text formatting.
For example:
This is Heading 2 style
This is Body style
This is Body style (modified)
***
The benefit of style-based design is that your text will stay consistent. Whatever you define for Body style will stay the same across the entire document. When you’re creating a book, you want it to look good! Keeping the text styles consistent helps your book look professionally designed.
Here are some of the things you’ll set in your text styles:
- Text Size – The text size. Most books use 10 to 14-point fonts.
- Text Weight – Weight refers to the width of the lines forming each word. Bold is a quick way to add weight to a word.
- Color – The text color. For most books, you’ll stick to standard black. But if you’re making a full-color book, you might want to apply some fun colors to your Heading styles.
- Font – The text font. Your Body style should use something easy to read.
- Spacing – The white space before, after, and between words or letters. Tinkering with spacing can affect how easy your book is to read.
- Justification – Most books use ‘Justified’ text that ensures the lines are the same across the page. If you use Justified text, be sure to look for lines with extra spacing and hyphenate a word to break the line.
There’s certainly more but these are the most important elements for getting your book made. I recommend creating your font styles before formatting your text. It’s helpful to know what the styles will look like as you begin adding your book to your page template.

Your Free Lulu Account
Create a Lulu Account today to print and publish your book for readers all around the world
Designing Image-Heavy Books
Writing a novel? You’re probably done with design. But if you’re creating a photo book, cookbook, or graphic novel, there’s more work ahead.
Since these kinds of books are maybe a little beyond ‘basic’ book design, I’m not going to go too deep on the subject. But I know a lot of people love to make one-off or occasional books like cookbooks or family photo albums.
Start with high-resolution images. At least 300 DPI is a must. Lower quality images will look grainy or pixelated when printed. Use software like Canva or Affinity Designer to manage image layouts. This gives you control over placement, ensuring your photos and text work together.
For photo books, you really need an advanced layout tool. I strongly recommend Affinity Designer or Adobe InDesign. If you’re looking for a lower cost (free) option, Canva is also a great way to create your photo book.
The reason being; you need to be able to control the placement of your images and text. Word processors might allow you to add images in-line or on top of the text. But to get the layout you want, you have to be able to manipulate both the text and image spaces.
Exporting Your Print-Ready PDF
The book is done. It’s written. You’ve adapted the basic page template to suit your needs and you’re satisfied with the design. Everything is inside the margins. The graphics are all high-resolution. The story is amazing.
It’s time to make your print-ready PDF.
For most software, that means exporting your file to PDF (save it in the software’s format too!) and ensuring the PDF settings are correct for printing. There are a few things to look for as you’re preparing to export:
- Is your PDF exporting at the right resolution? It would suck to carefully build your book file with high-resolution images, only to have them compressed when you make the PDF!
- Is your PDF flattened? When you create a book file, you’re adding content in layers. Text boxes, graphics, etc are all ‘stacked’ on the blank page. When you export, you need to be sure the entire file is flattened to a single layer.
- Are Your Fonts Embedded? If you used a fun font for your chapter titles, you need to be sure that font is embedded in the file. Otherwise, you’ll be relying on the printer also having that font available to print it!
- Is Your File A Reasonable Size? Is your file 37.9 gigabytes? If so, you need to compress it. (For reference, 37.9 gigs is HUGE). This usually only impacts creators making an image-heavy book. Extremely large files take a long time to upload and download; potentially timing out the process and preventing your file from printing!
Step 5 – Creating Your Book Cover
Your cover is the first thing readers will see. It’s your book’s first impression. Make it count.
Invest time in your cover design. Hire a graphic designer if you can. Use cover files that are optimized for both print and ebook formats. This ensures your book looks great, whether it’s on a shelf or a screen.
Step 6 – It’s Time to Publish Your Book
Your files are ready to go. It’s time to publish!
Take a moment to check everything once more. Ensure your images are high resolution. Verify your fonts are embedded. Make sure the file is flattened. A high-quality PDF is essential for a smooth printing experience.
Then head over to Lulu, log in or create your free account, and start the publishing process!
This guide is long and I only touch on a lot of the details. But we’ve covered the most basic elements of book design to help you get started. If you need specifics, you’ll want to check out our Book Creation Guide—there you’ll find details about spine sizing, PDF specifications, and more.
Whether you’re creating the first book in your epic fiction series or making a one-off memoir to share with family this holiday season, book-making has never been more accessible. It’s not easy to make a beautiful, professional-looking book. But it is something you can do with a little time, Lulu’s amazing resources, and (of course) your awesome story.